
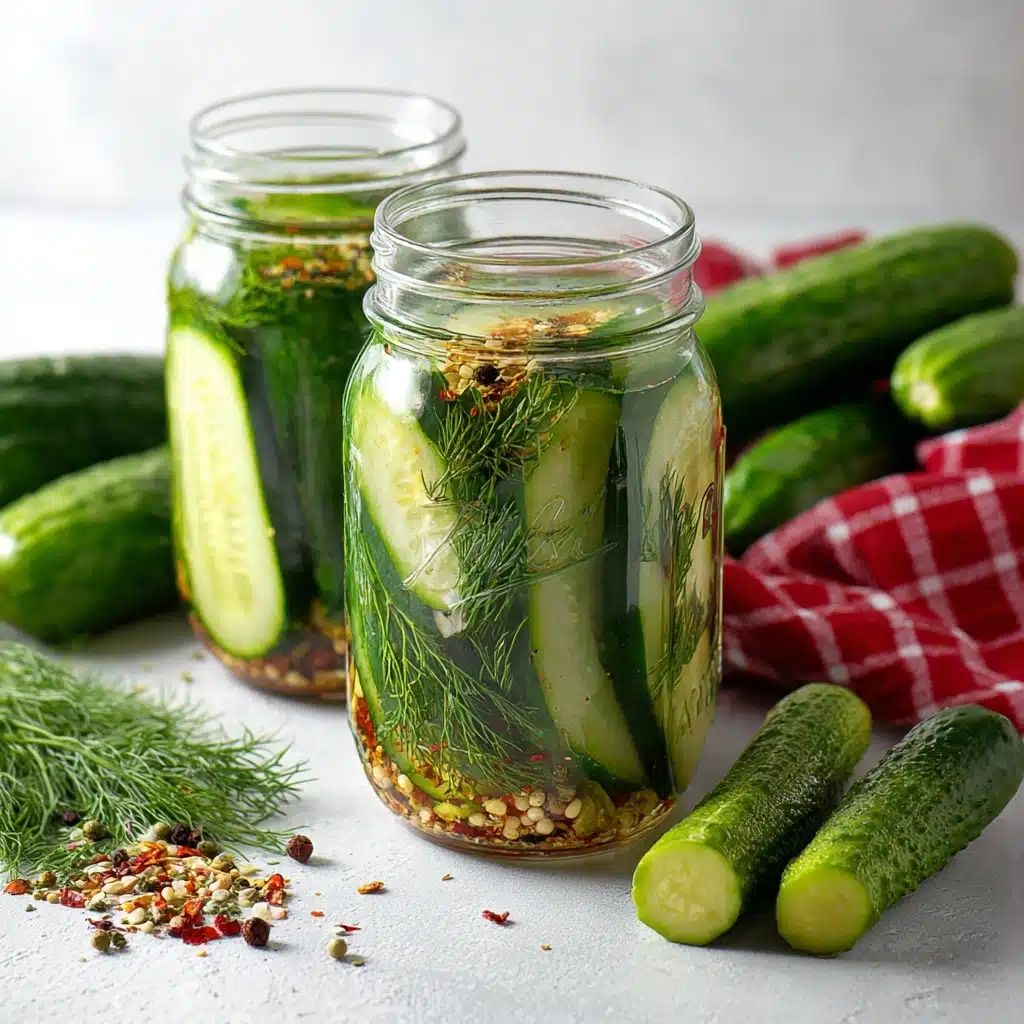
Refrigerator Dill Pickles Recipe
If you’ve never made Refrigerator Dill Pickles before, you’re in for a flavor-packed adventure that’s as easy as it is addictive. These pickles deliver a satisfying crunch and lively, tangy bite that’s sure to upgrade any sandwich, burger, or snack platter. The best part? Making delicious homemade pickles is far simpler than you might think—no canning or fancy equipment required. With just a handful of fresh ingredients and a quick brine, you’ll unlock a world of snappy, garlicky goodness waiting in your fridge. There’s nothing quite like the satisfaction of popping open your own jar of Refrigerator Dill Pickles and sharing them with friends and family!
Ingredients You’ll Need
Let’s talk about how such simple, straightforward ingredients can combine to create something absolutely irresistible. Each ingredient in Refrigerator Dill Pickles has a starring role, from the cucumbers that deliver crunch to the brine that brings balance and zest. Here’s what you’ll need and why each piece matters.
- Pickling cucumbers: Their firm texture is perfect for keeping the pickles crisp and snappy even after sitting in the brine.
- Water: Helps mellow out the acidity of the vinegar and makes up the bulk of your flavorful brine.
- White vinegar: Provides that classic pickle tang and helps preserve the cucumbers for several weeks in the fridge.
- Kosher salt: Enhances the overall flavor while drawing moisture from the cucumbers to ensure maximum crunch.
- Sugar: Just a touch is all you need for balance—it rounds out the bite from the vinegar without making the pickles sweet.
- Fresh dill: Delivers the signature fragrant, herbal aroma that gives Refrigerator Dill Pickles their name and identity.
- Garlic: Smashed cloves infuse the brine with a robust, savory edge that keeps you coming back for more.
- Peppercorn kernels: A handful per jar adds subtle heat and a complex background flavor that makes the brine pop.
How to Make Refrigerator Dill Pickles
Step 1: Prepare Your Ingredients and Jars
Start by giving your pickling cucumbers a good wash. You can slice them into coins or quarter them into spears—whatever your pickle-loving heart desires. Smash up your garlic cloves (don’t worry about being gentle), and trim off the thick stems from your bundle of dill. Don’t forget to run your mason jars through the dishwasher to make sure they’re squeaky clean and ready for action.
Step 2: Craft the Brine
Grab a medium saucepan and pour in the water, white vinegar, kosher salt, and sugar. Give it a stir and bring it to a boil to make sure everything dissolves fully; this is your pickle base! Once boiled, set the pan aside and let the brine cool to room temperature. You don’t want to pour hot liquid over your cucumbers, as that could make them less crunchy.
Step 3: Pack the Jars
Layer the cucumber slices or spears in your jars along with fresh dill, the smashed garlic cloves, and a generous but not overwhelming sprinkling of peppercorns. Resist the temptation to pack everything super tight—you want to leave room for the brine to move through and work its magic. This step is where you build the signature flavors of Refrigerator Dill Pickles.
Step 4: Add Brine and Refrigerate
Once your brine has cooled, pour it into the jars until the cucumbers are completely submerged. Make sure to get some brine into every nook and cranny. Seal the jars tightly with their lids and pop them in the fridge. It takes a touch of patience here—the pickles are best if you let them chill for about a week, but sneaking a taste earlier is totally allowed. The flavors deepen the longer they sit, so they’re worth the wait!
How to Serve Refrigerator Dill Pickles

Garnishes
Take your pickles to the next level by adding a sprinkle of freshly chopped dill, a few extra peppercorns, or even some thin-sliced onions as a final flourish. You can also drizzle a little brine over salads or deviled eggs for a tangy kick. The vibrant green and flecks of dill make Refrigerator Dill Pickles a head-turner on any table.
Side Dishes
Refrigerator Dill Pickles are the ultimate sidekick for burgers, barbecue, and all kinds of sandwiches. Serve them next to grilled cheese, classic deli sandwiches, or alongside roasted meats to brighten up your plate and add a crisp, flavorful punch to your meal.
Creative Ways to Present
Don’t stop at a classic pickle plate! Thread spears onto skewers for a fun party appetizer, chop them up and stir into potato or tuna salad, or use them atop charcuterie boards for a fresh contrast to rich cheeses and cured meats. You can even offer mini jars as homemade edible gifts—because everyone deserves a taste of these snappy Refrigerator Dill Pickles.
Make Ahead and Storage
Storing Leftovers
Once you’ve made your pickles, simply keep them in their airtight jars in the refrigerator. They’ll stay crisp and flavorful for at least 4 to 6 weeks. Make sure to use clean utensils to pull out pickles, as this keeps them fresh longer and prevents brine cloudiness.
Freezing
Unfortunately, Refrigerator Dill Pickles are not suited for freezing—the freezing process can turn them mushy and zap their delightful crunch. If you end up with more than you can eat, consider sharing with friends or gifting a jar instead!
Reheating
With Refrigerator Dill Pickles, there’s really no need to reheat—they’re best enjoyed cold or at cool room temperature. If you want to use them in a hot dish, just toss them in right at the end so you preserve that satisfying bite. Heating can dull the flavors and soften the texture, so fresh-and-cold is the way to go.
FAQs
How long do Refrigerator Dill Pickles need to sit before eating?
They’re technically ready to eat the next day, but for the best punch of flavor, let them rest in the fridge for at least one week. The flavors meld and the cucumbers get extra tangy and delicious.
Can I use regular cucumbers instead of pickling cucumbers?
You can, but pickling cucumbers have a firmer skin and fewer seeds, making for a crisper pickle. Regular cucumbers tend to get softer, so if you use them, try to find the youngest, freshest ones possible.
What if I don’t like garlic—can I leave it out?
Absolutely! While garlic gives Refrigerator Dill Pickles a robust depth of flavor, you can certainly omit it or reduce the amount to suit your own taste preferences. The dill and brine will still shine through.
Is it possible to reuse the leftover brine for another batch?
Technically you can, but the flavors and saltiness may have diminished after the first batch. It’s best to make a fresh brine each time for safety and maximum flavor, but you can always use the old brine to quick-pickle onions or carrots for a snack.
Can I add other spices to customize my Refrigerator Dill Pickles?
Go for it! Many people love adding mustard seeds, coriander, a dash of red pepper flakes, or bay leaves to personalize their pickles. Just remember not to overcrowd the jars, and let your creativity shine.
Final Thoughts
If you’re craving something crisp, tangy, and bright, give these Refrigerator Dill Pickles a try. They’re quick to make, incredibly satisfying, and leagues ahead of anything you’ll find in a store. One bite, and you’ll see why homemade is always worth the (minimal!) effort—happy pickling!
Print
Refrigerator Dill Pickles Recipe
- Total Time: 1 week (includes pickling time)
- Yield: Varies
- Diet: Vegetarian
Description
Learn how to make delicious refrigerator dill pickles at home with this easy recipe. These tangy and crunchy pickles are perfect for sandwiches, charcuterie boards, or as a snack.
Ingredients
Cucumbers:
- 12 pickling cucumbers (quantity can vary depending on size)
Brine:
- 4 cups water
- 2 cups white vinegar
- 2 tablespoons kosher salt
- 1 teaspoon sugar
Additional:
- 1 bunch fresh dill (amount can vary depending on preference, thick stems removed)
- 1 head garlic (skins removed, cloves smashed (use fewer cloves if it’s strong garlic))
- 1 tablespoon peppercorn kernels (about 10 per jar)
Instructions
- Prepare ingredients: Wash and slice cucumbers. Smash garlic cloves and remove dill stems. Sanitize mason jars.
- Prepare brine: Boil water, vinegar, salt, and sugar. Cool to room temperature.
- Make the pickles: Layer cucumbers, dill, garlic, and peppercorns in jars. Pour brine over cucumbers. Seal and refrigerate for at least a week before enjoying. Pickles can last 4-6 weeks.
- This recipe fills one pint jar and two quart jars.
Notes
- For a stronger garlic flavor, use more cloves.
- Adjust the amount of dill to suit your taste preferences.
- Prep Time: 20 minutes
- Cook Time: 5 minutes
- Category: Appetizer/Snack
- Method: Pickling
- Cuisine: American
Nutrition
- Serving Size: 1 pickle (approximately 30g)
- Calories: 5
- Sugar: 0g
- Sodium: 200mg
- Fat: 0g
- Saturated Fat: 0g
- Unsaturated Fat: 0g
- Trans Fat: 0g
- Carbohydrates: 1g
- Fiber: 0g
- Protein: 0g
- Cholesterol: 0mg
Keywords: refrigerator dill pickles, homemade pickles, pickling recipe, easy pickles


