
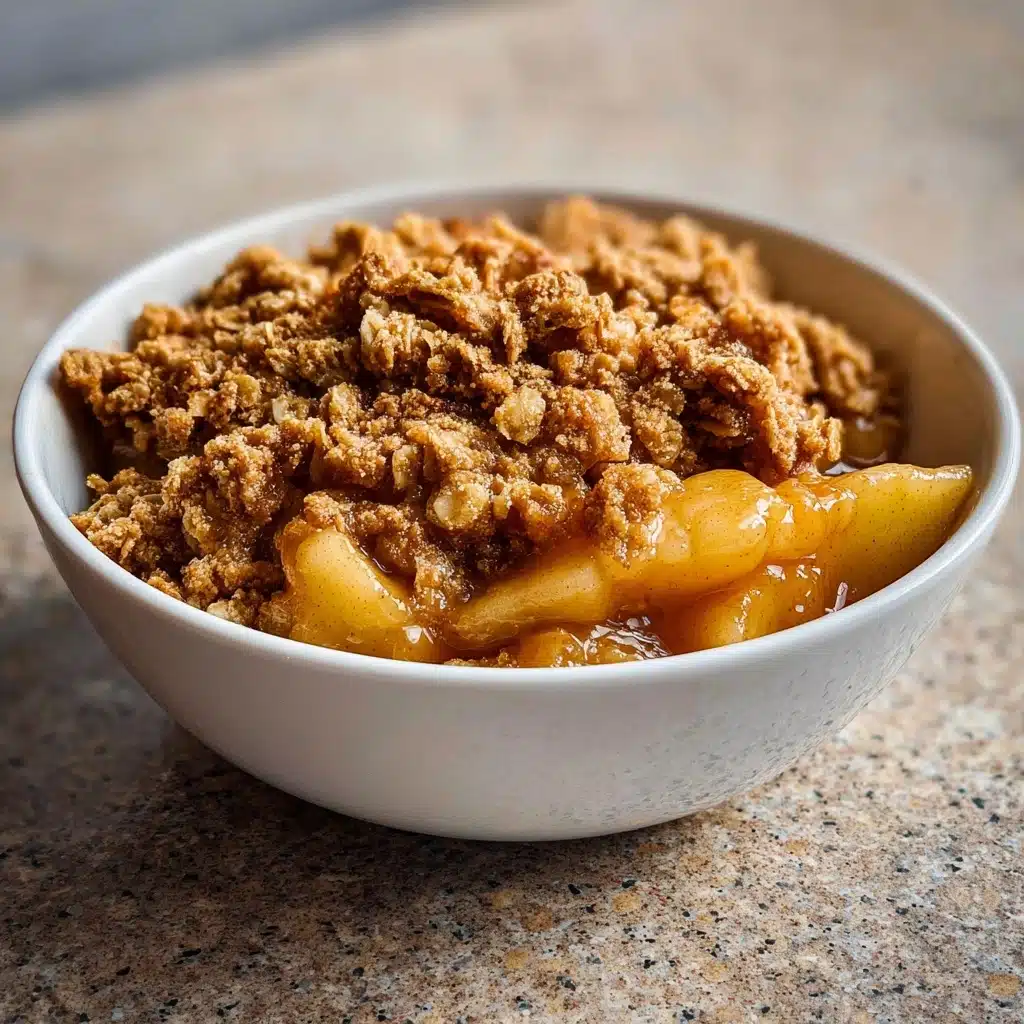
Classic Apple Crisp Recipe
If you’re searching for the perfect cozy dessert to satisfy a sweet tooth and fill your home with the most irresistible aromas, look no further than Classic Apple Crisp. Juicy apples nestled under a blanket of golden, buttery crumble make this dish a true celebration of everything we love about home baking. Whether you serve it steaming from the oven with ice cream on a chilly evening or bring it to a gathering to share, this Classic Apple Crisp is a time-tested favorite that never fails to delight.
Ingredients You’ll Need
The beauty of Classic Apple Crisp lies in its simplicity—you probably already have most of these pantry staples on hand! Every ingredient has a special part to play, building layers of flavor and texture that transform humble apples into something truly spectacular.
- Apples: Choose a mix like Granny Smith, Honeycrisp, or Fuji; they offer the perfect sweet-tart balance and hold their shape beautifully during baking.
- Granulated sugar: Lends just the right subtle sweetness to the apples without overpowering their natural flavor.
- Ground cinnamon: The warm, spicy note that makes apple desserts so comforting and aromatic.
- Ground nutmeg: Just a dash adds depth and a lovely hint of earthiness.
- Lemon juice: Brightens the apples and keeps them from browning, adding a subtle zing.
- All-purpose flour: This forms the backbone of the crisp topping, providing structure.
- Light brown sugar: Adds moisture and a hint of caramel flavor to the crumble.
- Old-fashioned rolled oats: Bring delightful texture and a rustic chew to the topping.
- Unsalted butter: Cold and cubed—this is the magic behind that golden, irresistible crumbly top!
- Salt: Just a pinch elevates all the other flavors and keeps things from tasting flat.
How to Make Classic Apple Crisp
Step 1: Prepare the Baking Dish
Start by setting the stage for your Classic Apple Crisp. Preheat your oven to 375°F (190°C) and give a 9×13 inch baking dish a light coat of grease. This not only keeps the crisp from sticking but also ensures every bite lifts out easily. A ready dish makes assembly quick and fuss-free.
Step 2: Mix the Apple Filling
Grab your biggest mixing bowl and toss in your sliced apples along with the granulated sugar, cinnamon, nutmeg, and lemon juice. Give everything a gentle toss so those apple slices glisten with flavor in every nook and cranny. This is the heart of your Classic Apple Crisp—let the apples soak up all that spiced goodness.
Step 3: Combine the Dry Topping Ingredients
In a separate bowl, mix together the flour, brown sugar, oats, and salt. You’ll notice the oats give this topping its signature texture. Mixing these dry ingredients first means everything will distribute evenly—no brown sugar clumps lurking anywhere!
Step 4: Cut in the Butter
Scatter your cold butter cubes over the topping mixture. Use a pastry blender, two forks, or simply your fingertips to work the butter into the flour mixture until you have coarse crumbs. It’s completely fine if you see little flecks of butter; these bake up into golden pockets of crispiness that make Classic Apple Crisp truly addictive.
Step 5: Assemble the Crisp
Evenly sprinkle that luscious crumble topping right over the apple mixture in your dish. Don’t be shy—cover every inch so each bite gets both juicy filling and that signature crunchy blanket.
Step 6: Bake to Perfection
Slide the dish into your preheated oven and let it bake for 35 to 45 minutes. You’ll know it’s ready when the apples are bubbling and the topping is deeply golden and crisp. Your kitchen will smell absolutely heavenly!
Step 7: Cool and Serve
Patience here pays off—let your Classic Apple Crisp cool for about 10 to 15 minutes before serving. This helps the filling set just enough, so every scoop holds together. Serve it warm and, if you like, crown it with a scoop of vanilla ice cream or a dollop of whipped cream.
How to Serve Classic Apple Crisp

Garnishes
Few things enhance a bowl of Classic Apple Crisp like a scoop of rich vanilla ice cream slowly melting into all those nooks of warm crumble. If you’re feeling extra, try a swirl of whipped cream, a dusting of cinnamon, or even a light drizzle of caramel sauce. Each topping brings out new character in the crisp’s flavors.
Side Dishes
Classic Apple Crisp already shines on its own, but it also pairs beautifully with a cup of freshly brewed coffee or spiced chai. For brunch or a larger spread, serve it with lighter sides like Greek yogurt, fresh berries, or a medley of autumn fruit for balance.
Creative Ways to Present
You can make the presentation memorable by baking individual crisps in ramekins for a personal touch. If you want to impress at a potluck, layer servings in small mason jars for easy (and adorable) grab-and-go portions. Classic Apple Crisp also works beautifully as a topping over pancakes or waffles the next morning.
Make Ahead and Storage
Storing Leftovers
Leftover Classic Apple Crisp keeps wonderfully for up to four days. Let it cool to room temperature, cover the dish tightly with foil or transfer it to an airtight container, and store it in the refrigerator. The flavors deepen as it sits—making your next-day dessert even better!
Freezing
If you want to bake ahead or save a batch for spontaneous cravings, Classic Apple Crisp freezes like a dream. Either freeze the unbaked assembled crisp (cover tightly) or freeze leftovers. When ready to enjoy, bake from frozen for a few extra minutes or thaw overnight in the fridge first.
Reheating
To revive that fresh-from-the-oven magic, reheat portions of Classic Apple Crisp in a 350°F oven for 10–15 minutes until bubbly and crisp. For fast cravings, the microwave also works—just don’t expect the topping to be quite as crunchy.
FAQs
Which apple varieties work best for Classic Apple Crisp?
Go for apples that hold their shape and offer a balance of tart and sweet, like Granny Smith, Honeycrisp, Fuji, or even a mix. They keep the crisp from turning mushy and bring more complex flavor to every bite.
Can I make Classic Apple Crisp gluten-free?
Absolutely! Swap the all-purpose flour for a gluten-free blend, and double-check your oats are labeled gluten-free. You’ll still get that beloved texture.
How do I know when the crisp is done baking?
The topping should be golden and crunchy, and the edges of the pan will show bubbly juices from the apples. A fork or knife should easily pierce the apples when tested in the center.
Can I make the topping in advance?
Yes! You can prep the crumble topping a day or two ahead and keep it chilled in the refrigerator. That way, assembly is even quicker when you’re ready to bake your Classic Apple Crisp.
What should I do if my topping isn’t crisping up?
If your topping is still pale after the designated time, pop the dish back in the oven for another 5–10 minutes. Make sure the butter was cold when mixed in, as that’s the secret to a crispy, crunchy top.
Final Thoughts
If you love desserts that truly deliver maximum comfort with minimal fuss, make Classic Apple Crisp your next kitchen project. It’s a guaranteed crowd-pleaser—simple, nostalgic, and the kind of treat that makes any occasion feel extra cozy. Gather your ingredients, follow the steps, and let your kitchen fill with that irresistible, sweet autumn scent!
Print
Classic Apple Crisp Recipe
- Total Time: 1 hour 5 minutes
- Yield: 1 9×13 inch dish 1x
- Diet: Vegetarian
Description
A classic apple crisp recipe that combines tender, cinnamon-spiced apples with a crispy oat topping. Perfect for a cozy dessert that’s both comforting and delicious.
Ingredients
For the Apple Filling:
- 6 medium apples (such as Granny Smith, Honeycrisp, or Fuji), peeled, cored, and sliced
- 1/2 cup granulated sugar
- 1 teaspoon ground cinnamon
- 1/4 teaspoon ground nutmeg
- 1 tablespoon lemon juice
For the Crumble Topping:
- 1 cup all-purpose flour
- 1/2 cup packed light brown sugar
- 1/2 cup old-fashioned rolled oats
- 1/2 cup (1 stick) unsalted butter, cold and cut into small pieces
- 1/4 teaspoon salt
Instructions
- Preheat Oven: Preheat the oven to 375°F (190°C) and lightly grease a 9×13 inch baking dish.
- Prepare Apple Filling: In a large bowl, combine sliced apples, granulated sugar, cinnamon, nutmeg, and lemon juice. Toss to coat and pour into the baking dish.
- Make Crumble Topping: In a separate bowl, combine flour, brown sugar, oats, and salt. Cut in the cold butter until crumbly.
- Top the Apples: Sprinkle the crumble topping evenly over the apples.
- Bake: Bake for 35-45 minutes until apples are tender and topping is golden and bubbly.
- Cool and Serve: Let the apple crisp cool for 10-15 minutes before serving. Enjoy warm with ice cream or whipped cream.
- Prep Time: 20 minutes
- Cook Time: 45 minutes
- Category: Dessert
- Method: Baking
- Cuisine: American
Nutrition
- Serving Size: 1 serving
- Calories: 280
- Sugar: 24g
- Sodium: 75mg
- Fat: 11g
- Saturated Fat: 6g
- Unsaturated Fat: 4g
- Trans Fat: 0g
- Carbohydrates: 45g
- Fiber: 3g
- Protein: 2g
- Cholesterol: 25mg
Keywords: Apple crisp, dessert, apples, crumble, comfort food


