
Primary Sidebar Recipe
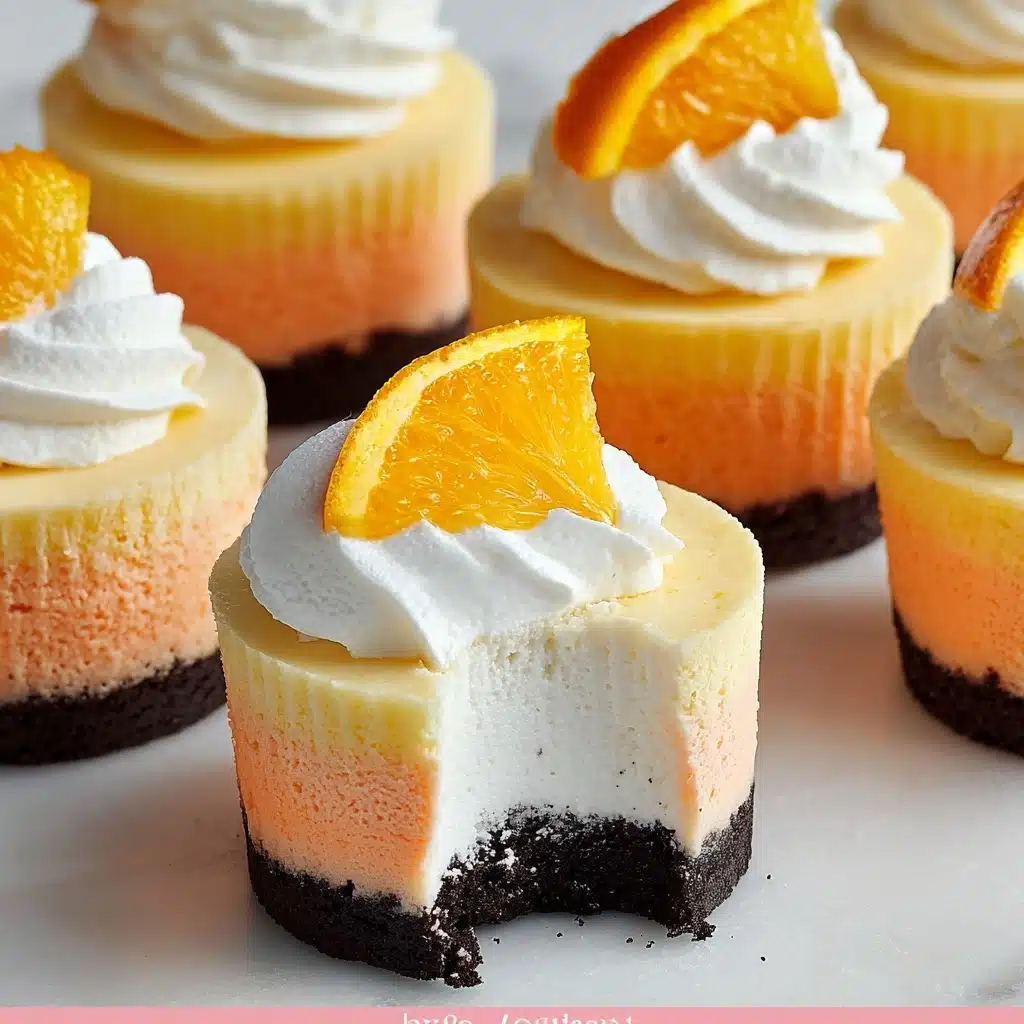
There is nothing quite like the joy of sinking your teeth into something both creamy and vibrant, which is exactly why these Orange Creamsicle Mini Cheesecakes win my heart every single time. This delightful treat combines the nostalgic burst of citrus with the smooth decadence of cheesecake in an irresistibly cute, bite-sized package. Whether you’re scrolling through the Primary Sidebar looking for your next showstopper dessert or planning a summer gathering, these mini cheesecakes deliver on flavor, ease, and that extra little pop of color and fun to make your day brighter.
Ingredients You’ll Need
These ingredients are refreshingly simple yet absolutely essential, each playing a perfect part in creating the ultimate balance of flavors and textures. From the crisp chocolatey base to the airy orange-infused cheesecake cloud on top, every component has a purpose.
- Oreo Cookies: Act as a rich, crunchy crust base that contrasts beautifully with the creamy filling.
- Cream Cheese (16 ounces): This classic base provides that luscious, velvety texture essential to any cheesecake.
- Powdered Sugar (½ cup): Sweetens the cream cheese smoothly without grittiness.
- Vanilla Extract (1 teaspoon): Adds a subtle warmth and depth to balance the citrus notes.
- Heavy Whipping Cream (1 cup): Whipped to perfect peaks for a light, fluffy texture.
- Orange Zest (from 1 orange): Infuses fresh, natural orange aroma and taste that brightens each bite.
- Orange Extract (½ teaspoon): Amplifies the orange flavor for that true creamsicle essence.
- Orange Gel Food Coloring (2-3 drops): Gives the cheesecake a fun, vibrant orange hue synonymous with creamsicles.
- Whipped Cream and Orange Slices (optional): Perfect for garnishing and adding a fresh pop at serving time.
How to Make Primary Sidebar
Step 1: Prepare Your Crust Base
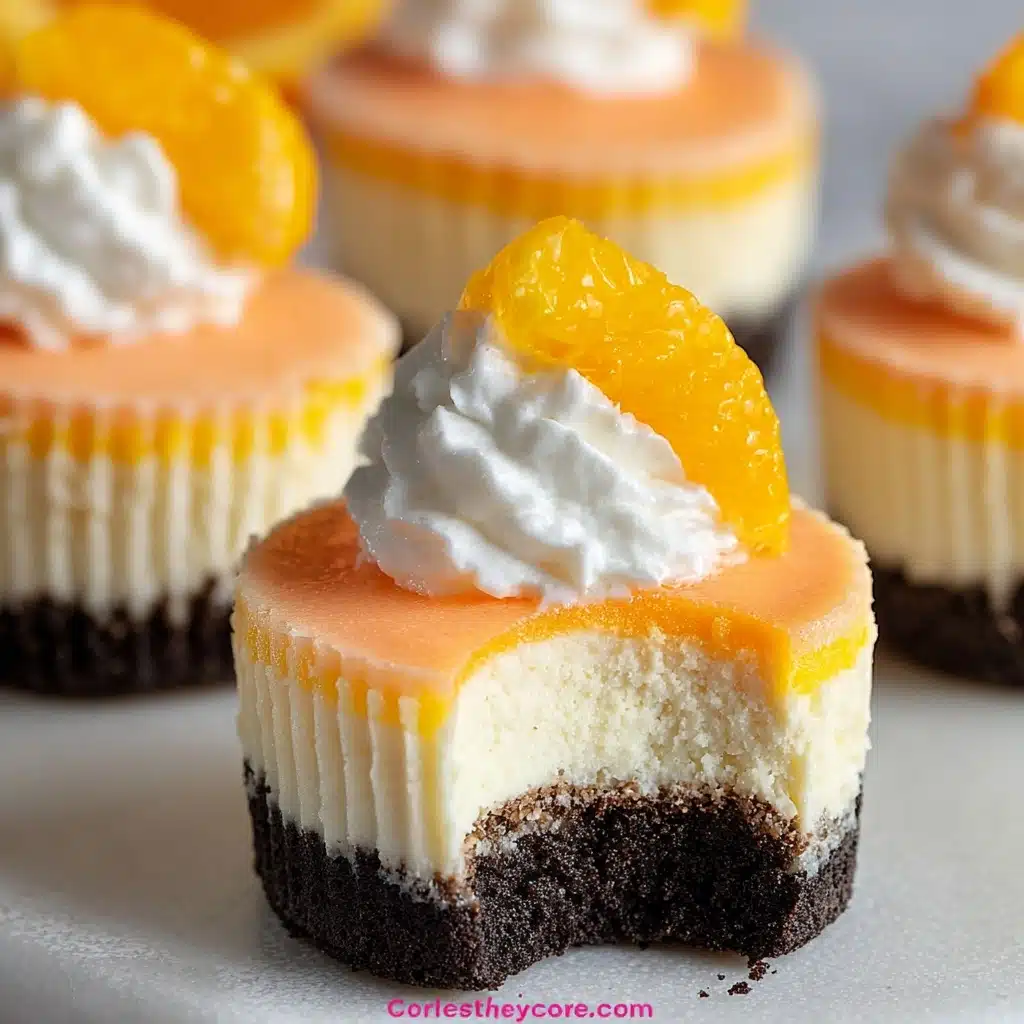
Begin by lining a muffin tin with 12 cupcake liners. Place one Oreo cookie at the bottom of each liner. This simple foundation adds that delightful crunch and chocolate flavor that perfectly complements the creamy filling.
Step 2: Mix the Cream Cheese Filling
In a medium bowl, beat the cream cheese and powdered sugar together until you achieve a luxuriously smooth and creamy texture. This step sets the stage for your cheesecake’s rich, dreamy consistency.
Step 3: Whip the Cream
In a separate bowl, whip the heavy cream until soft peaks form. Then, gently fold in the orange extract and continue whipping until stiff peaks develop. This airy cream brings lightness and volume, balancing the tanginess perfectly.
Step 4: Combine Mixtures
Fold the cream cheese mixture into the whipped cream carefully on a low speed, just to combine everything without deflating the fluffiness. This ensures your cheesecake remains light and luscious.
Step 5: Create the Two Toned Cheesecake Layers
Divide the cheesecake mixture evenly into two bowls. To one half, add the freshly grated orange zest and a few drops of orange gel food coloring, blending gently. Start by spreading the plain cream cheese mixture over the Oreo crusts, then layer the orange-tinted mixture on top. Use a toothpick to swirl them lightly, crafting a beautiful marbled effect that will wow anyone browsing the Primary Sidebar.
Step 6: Chill and Set
Refrigerate the mini cheesecakes for at least 3 to 4 hours or overnight to allow them to firm up perfectly. This chilling time helps the flavors meld and the texture become just right.
How to Serve Primary Sidebar
Garnishes
A swirl of whipped cream and a thin orange slice atop each mini cheesecake bring extra freshness and elegance. These simple garnishments not only enhance the appearance but also refresh the palate with a burst of citrus aroma.
Side Dishes
Pair your Orange Creamsicle Mini Cheesecakes with light, fresh fruit salads or a tangy berry compote for a vibrant twist. These sides complement the creamy sweetness and add variety to your dessert spread visible in the Primary Sidebar.
Creative Ways to Present
For a fun presentation, serve these cheesecakes in a clear glass trifle dish or display them on a tiered dessert stand. Incorporate edible flowers or orange zest curls around the base for a professional, festive finish that catches the eye and fits perfectly alongside other treats in the Primary Sidebar menu.
Make Ahead and Storage
Storing Leftovers
Keep your mini cheesecakes in an airtight container in the refrigerator for up to 3 days. The flavors actually improve with a little rest, making these leftovers a delightful treat later in the week.
Freezing
Wrap each cheesecake individually in plastic wrap and place them in a freezer-safe container. They freeze well for up to one month. Thaw overnight in the fridge for the best texture and flavor.
Reheating
Since these cheesecakes are best enjoyed chilled, avoid reheating. Instead, let them come to room temperature for about 15 minutes before serving to soften the texture slightly without losing their creamy integrity.
FAQs
Can I use a different cookie for the crust instead of Oreos?
Absolutely! Graham crackers, digestive biscuits, or even shortbread cookies can make excellent crusts. Each choice brings its unique flavor and texture, so feel free to experiment and find your favorite.
Is it necessary to use orange gel food coloring?
The food coloring is entirely optional and mainly for aesthetic appeal. If you prefer a more natural look, the orange zest alone will impart beautiful color and flavor without any artificial hues.
Can I make these cheesecakes dairy-free?
You can try substituting dairy-free cream cheese and coconut whipped cream. However, be aware that the texture and taste might vary slightly since the traditional creaminess of dairy products is quite distinctive.
How long do these mini cheesecakes take to set?
They need at least 3 to 4 hours in the refrigerator, but leaving them overnight is ideal for the creamiest, firmest texture that holds beautifully when served.
Can I prepare these cheesecakes without a mixer?
While a mixer makes the process easier and ensures a smooth texture, you can use a sturdy whisk and some elbow grease. Just be patient when whipping the heavy cream to reach those perfect peaks.
Final Thoughts
I cannot recommend these Orange Creamsicle Mini Cheesecakes enough if you’re craving a dessert that is both stunning and incredibly delicious. This recipe brings together simple ingredients in a way that feels special and indulgent, fitting seamlessly into your kitchen and shining brightly on your Primary Sidebar. Give it a try, and I promise it will become a household favorite before long.
Print
Primary Sidebar Recipe
- Total Time: 4 hours 20 minutes (includes chilling time)
- Yield: 12 mini cheesecakes 1x
- Diet: Vegetarian
Description
These Orange Creamsicle Mini Cheesecakes offer a delightful and easy no-bake dessert with a crunchy Oreo cookie crust and a creamy, fluffy cheesecake filling bursting with fresh orange flavor. Perfect for summer treats or any festive occasion.
Ingredients
For the crust:
- 12 Oreo Cookies
For the cheesecake:
- 16 ounces cream cheese, room temperature
- ½ cup powdered sugar
- 1 teaspoon vanilla extract
- 1 cup heavy whipping cream
- Zest of 1 Orange
- ½ teaspoon Orange extract
- 2–3 drops of Orange gel food coloring
For garnish:
- Whipped cream (optional)
- Orange slices (optional)
Instructions
- Prepare cupcake liners and crust: Line a muffin tin with 12 cupcake liners. Place one Oreo cookie at the bottom of each liner and set aside to form the crust base.
- Make the cream cheese mixture: In a medium bowl, beat the room temperature cream cheese with powdered sugar until smooth and creamy, ensuring there are no lumps.
- Whip the heavy cream: In a separate bowl, whip the heavy cream until soft peaks start to form, then add the orange extract and continue whipping until stiff peaks develop.
- Combine mixtures: Gently fold the cream cheese mixture into the whipped cream on low speed just until combined, making sure not to deflate the whipped cream.
- Divide and flavor the filling: Split the cheesecake mixture evenly into two separate bowls. Leave one plain, and to the second bowl add the orange zest and 2-3 drops of orange gel food coloring. Mix gently on low speed until fully combined.
- Assemble mini cheesecakes: Spread the plain cheesecake mixture evenly over the Oreo cookie crusts in the cupcake liners. Then layer the orange-flavored cheesecake mixture on top, spreading carefully. Use a toothpick to gently swirl the two layers for a marbled effect.
- Chill: Place the mini cheesecakes in the refrigerator and chill for at least 3 to 4 hours, preferably overnight, until set and firm.
- Garnish and serve: Once set, optionally top each mini cheesecake with whipped cream and a fresh orange slice before serving for an attractive presentation and added flavor.
Notes
- Make sure the cream cheese is at room temperature to ensure a smooth filling without lumps.
- Use orange gel food coloring sparingly to avoid overpowering the natural flavor.
- You can substitute Oreos with gluten-free cookies for a gluten-free version.
- For best results, chill the cheesecakes overnight to allow flavors to meld and the filling to firm up nicely.
- Handle the filling gently when folding to maintain the fluffiness from the whipped cream.
- Prep Time: 20 minutes
- Cook Time: 0 minutes (no-bake)
- Category: Desserts
- Method: No-Bake
- Cuisine: American
Nutrition
- Serving Size: 1 mini cheesecake
- Calories: 250 kcal
- Sugar: 18 g
- Sodium: 110 mg
- Fat: 18 g
- Saturated Fat: 11 g
- Unsaturated Fat: 5 g
- Trans Fat: 0 g
- Carbohydrates: 18 g
- Fiber: 1 g
- Protein: 3 g
- Cholesterol: 65 mg
Keywords: orange creamsicle mini cheesecakes, no bake cheesecake, summer desserts, orange dessert, Oreo crust cheesecake, easy mini cheesecakes
