
Amazing 20-Minute Green Chile Chicken Enchiladas Recipe
Introduction
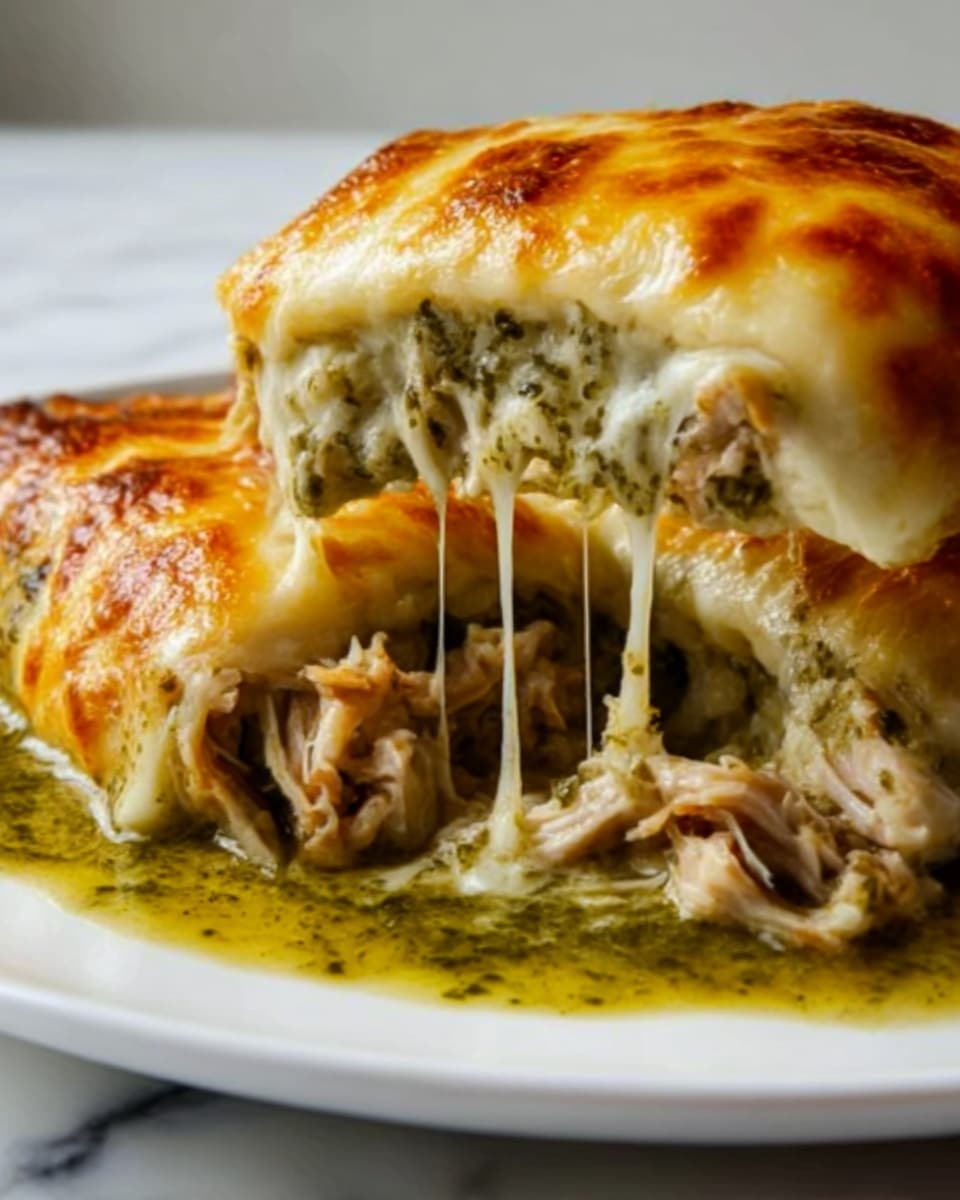
These Amazing 20-Minute Green Chile Chicken Enchiladas are perfect for a quick and delicious weeknight dinner. Creamy, cheesy, and packed with tender chicken and a touch of green chile, they bring a flavorful Southwestern twist to your table.
Ingredients
- 2 cups cooked, shredded chicken (rotisserie works well)
- 10 corn or flour tortillas
- 1 (10 oz) can green enchilada sauce
- 1 (4 oz) can diced green chiles, undrained
- 8 oz cream cheese, softened
- 1 cup sour cream
- 1 cup shredded Monterey Jack cheese, plus more for topping
- 1/2 cup chopped onion
- 1 teaspoon ground cumin
- 1/2 teaspoon garlic powder
- Salt and pepper to taste
- Optional: Chopped cilantro for garnish
Instructions
- Step 1: Preheat your oven to 375°F (190°C). Lightly grease a 9×13 inch baking dish.
- Step 2: In a large bowl, mix the softened cream cheese, sour cream, 1 cup of Monterey Jack cheese, diced green chiles, chopped onion, cumin, and garlic powder. Season with salt and pepper.
- Step 3: Stir the shredded chicken into the cream cheese mixture until everything is well combined. This is your filling.
- Step 4: In a small saucepan over medium heat, gently warm the green enchilada sauce. Do not boil.
- Step 5: Dip each tortilla briefly into the warm sauce to soften it slightly. This prevents tearing.
- Step 6: Spread a thin layer of the remaining sauce on the bottom of the prepared baking dish.
- Step 7: Place a line of filling down the center of each softened tortilla. Roll the tortilla tightly and place it seam-down in the baking dish. Repeat until all tortillas are filled and arranged.
- Step 8: Pour the rest of the green enchilada sauce evenly over the rolled enchiladas.
- Step 9: Sprinkle the top generously with extra shredded Monterey Jack cheese.
- Step 10: Bake for 20 to 25 minutes, or until the sauce is bubbly and the cheese is melted and slightly golden.
- Step 11: Let the casserole rest for 5 minutes before serving. Garnish with cilantro if you like.
Tips & Variations
- Use rotisserie chicken for a time-saving shortcut without sacrificing flavor.
- Try adding a diced jalapeño for extra heat if you like spice.
- Swap Monterey Jack for cheddar or a Mexican cheese blend for a different flavor.
- To make it vegetarian, substitute the chicken with black beans or sautéed vegetables.
- For crispier tortillas, lightly toast them in a dry skillet before dipping in the sauce.
Storage
Store leftover enchiladas covered in the refrigerator for up to 3 days. To reheat, warm covered in the oven at 350°F (175°C) until heated through, about 15 minutes. You can also microwave individual portions, but the oven reheating helps keep the texture better.
How to Serve

Serve this delicious recipe with your favorite sides.
FAQs
Can I make these enchiladas ahead of time?
Yes, you can assemble the enchiladas and store them covered in the refrigerator for up to 24 hours before baking. Just add a few extra minutes to the baking time if baking from cold.
Can I use flour tortillas instead of corn?
Absolutely! Both corn and flour tortillas work well. Flour tortillas tend to be softer and may be easier to roll without tearing.
Print
Amazing 20-Minute Green Chile Chicken Enchiladas Recipe
- Total Time: 35 minutes
- Yield: 10 enchiladas (serves 4-6) 1x
Description
These Amazing 20-Minute Green Chile Chicken Enchiladas are a quick and flavorful Mexican-inspired casserole featuring shredded chicken, creamy green chile sauce, and melted Monterey Jack cheese. Perfect for a weeknight dinner, these enchiladas pack a punch of zest with green chiles and spices, baked until bubbly and golden.
Ingredients
Filling
- 2 cups cooked, shredded chicken (rotisserie works well)
- 8 oz cream cheese, softened
- 1 cup sour cream
- 1 cup shredded Monterey Jack cheese
- 1 (4 oz) can diced green chiles, undrained
- 1/2 cup chopped onion
- 1 teaspoon ground cumin
- 1/2 teaspoon garlic powder
- Salt and pepper to taste
Enchiladas
- 10 corn or flour tortillas
- 1 (10 oz) can green enchilada sauce
- Additional shredded Monterey Jack cheese for topping
- Optional: Chopped cilantro for garnish
Instructions
- Preheat and prepare baking dish: Preheat your oven to 375°F (190°C). Lightly grease a 9×13 inch baking dish to prevent sticking and ensure easy cleanup.
- Make the filling: In a large bowl, mix the softened cream cheese, sour cream, 1 cup shredded Monterey Jack cheese, diced green chiles, chopped onion, ground cumin, and garlic powder. Season the mixture with salt and pepper to taste for a balanced flavor.
- Add chicken to filling: Stir the shredded cooked chicken into the cream cheese mixture until all ingredients are thoroughly combined and the filling is creamy.
- Warm the sauce: In a small saucepan over medium heat, gently warm the green enchilada sauce, taking care not to let it boil, which can alter the flavor and texture.
- Soften tortillas: Briefly dip each tortilla into the warm enchilada sauce to soften them slightly. This step helps prevent tortillas from tearing when rolled.
- Prepare baking dish base: Spread a thin layer of the remaining green enchilada sauce on the bottom of the prepared baking dish to keep the enchiladas moist and enhance flavor.
- Fill and roll tortillas: Place a line of the chicken and cheese filling down the center of each softened tortilla. Roll each tortilla tightly and place seam-side down in the baking dish. Repeat until all tortillas are filled and arranged neatly.
- Add sauce and cheese on top: Pour the rest of the green enchilada sauce evenly over the rolled enchiladas to coat them well, then sprinkle extra shredded Monterey Jack cheese generously on top.
- Bake enchiladas: Bake in the preheated oven for 20 to 25 minutes, or until the sauce is bubbly and the cheese on top is melted and slightly golden brown.
- Rest and garnish: Let the casserole rest for 5 minutes after baking to allow flavors to meld and slicing to be easier. Garnish with chopped cilantro if desired before serving.
Notes
- Use rotisserie chicken to save prep time and add extra flavor.
- Adjust the spice level by choosing mild or hot diced green chiles.
- Tortillas can be corn or flour based on personal preference or dietary needs.
- If cream cheese is hard, soften it by microwaving for 20-30 seconds to ensure easy mixing.
- Leftovers can be refrigerated for up to 3 days and reheated in the oven or microwave.
- For a lower calorie option, use reduced-fat cream cheese, sour cream, and cheese.
- Prep Time: 10 minutes
- Cook Time: 20-25 minutes
- Category: Main Dish
- Method: Baking
- Cuisine: Mexican
Keywords: green chile chicken enchiladas, quick enchiladas, Mexican casserole, baked enchiladas, easy chicken dinner


