
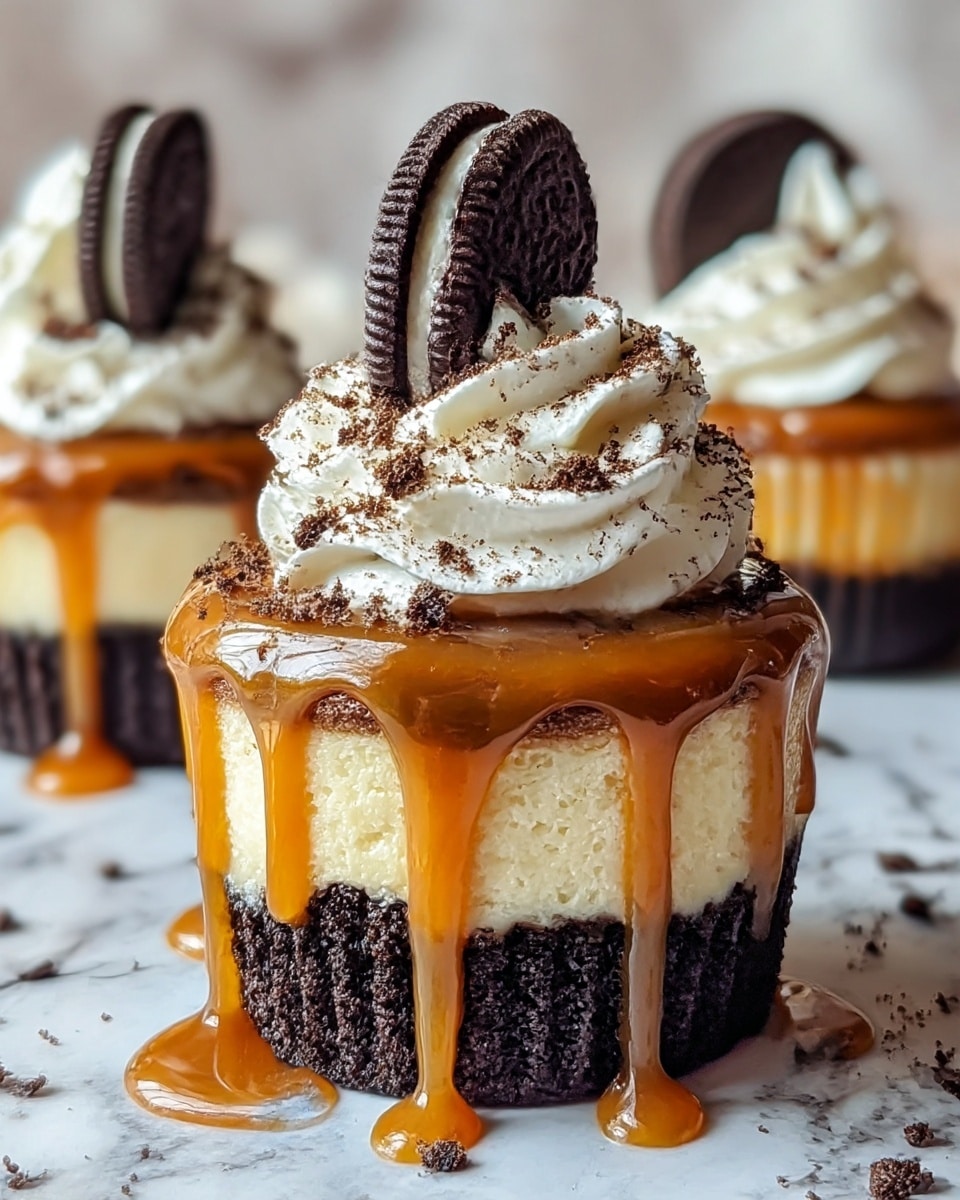
Decadent No-Bake Oreo Cheesecake Cups Recipe
Introduction
Indulge in these Decadent No-Bake Oreo Cheesecake Cups, a perfect dessert that combines creamy cheesecake with crunchy Oreo crust. Easy to prepare and wonderfully rich, these cups are great for impressing guests or enjoying a sweet treat anytime.
Ingredients
- 24 Oreo cookies (divided)
- 4 tablespoons unsalted butter (melted)
- 16 oz cream cheese (softened)
- 1/2 cup granulated sugar
- 1 teaspoon vanilla extract
- 1 cup heavy whipping cream
- 2 tablespoons powdered sugar
- Additional crushed Oreos for topping
Instructions
- Step 1: Prepare the Oreo crust by crushing 16 Oreo cookies into fine crumbs using a food processor. Combine the crumbs with melted butter and press the mixture evenly into the bottom of 6 small cups or jars to form a firm layer.
- Step 2: In a mixing bowl, beat the softened cream cheese, granulated sugar, and vanilla extract until smooth and creamy. Set this mixture aside.
- Step 3: In a separate bowl, whip the heavy whipping cream and powdered sugar together until stiff peaks form. Gently fold the whipped cream into the cream cheese mixture until fully combined and smooth.
- Step 4: Spoon the cheesecake filling over the Oreo crust in each cup, smoothing the tops with a spatula.
- Step 5: Crush the remaining 8 Oreo cookies and sprinkle them evenly over the cheesecake layer as a topping.
- Step 6: Cover the cups with plastic wrap and refrigerate for at least 4 hours until the cheesecake is fully set.
- Step 7: When ready to serve, remove the cups from the refrigerator. Optionally, garnish with additional whipped cream or Oreo crumbles for an extra touch of flavor.
Tips & Variations
- For a chocolate lover’s twist, add a spoonful of chocolate syrup to the cheesecake filling before folding in the whipped cream.
- To make individual servings extra special, try layering mini Oreo pieces within the filling before chilling.
- If you don’t have a food processor, place Oreo cookies in a sealed bag and crush them with a rolling pin to get fine crumbs.
- Use gluten-free Oreo cookies if you need a gluten-free dessert option.
Storage
Store the cheesecake cups covered in the refrigerator for up to 3 days. When reheating is needed, it’s best to enjoy them chilled as the texture may change if warmed. These no-bake cups are ideal served cold and fresh.
How to Serve

Serve this delicious recipe with your favorite sides.
FAQs
Can I make these cheesecake cups ahead of time?
Yes, they can be prepared and refrigerated for up to 3 days in advance, making them perfect for meal prep or entertaining.
What can I use instead of heavy whipping cream?
You can substitute with whipped coconut cream for a dairy-free version, but the texture and flavor may vary slightly.
Print
Decadent No-Bake Oreo Cheesecake Cups Recipe
- Total Time: 4 hours 20 minutes
- Yield: 6 servings 1x
- Diet: Vegetarian
Description
These Decadent No-Bake Oreo Cheesecake Cups are a creamy, indulgent dessert combining crushed Oreo cookies with a smooth cream cheese filling. Perfect for any occasion, this easy-to-make treat features a buttery Oreo crust, luscious no-bake cheesecake layer, topped with extra crushed Oreos for added texture and flavor.
Ingredients
Oreo Crust
- 16 Oreo cookies (crushed)
- 4 tablespoons unsalted butter (melted)
Cheesecake Filling
- 16 oz cream cheese (softened)
- 1/2 cup granulated sugar
- 1 teaspoon vanilla extract
- 1 cup heavy whipping cream
- 2 tablespoons powdered sugar
Topping
- 8 Oreo cookies (crushed, for topping)
- Additional whipped cream or Oreo crumbles (optional garnish)
Instructions
- Prepare Oreo Crust: In a food processor, crush 16 Oreo cookies into fine crumbs. Mix the crumbs with melted butter until well combined. Divide this mixture evenly among 6 small cups or jars, pressing down firmly to create an even, compact layer at the bottom.
- Make Cheesecake Filling: In a mixing bowl, beat the softened cream cheese, granulated sugar, and vanilla extract together until the mixture is smooth and creamy. Set aside.
- Whip the Cream: In a separate bowl, whip the heavy whipping cream and powdered sugar until stiff peaks form. Gently fold the whipped cream into the cream cheese mixture, combining carefully to maintain a light, fluffy texture.
- Layer the Filling: Spoon the cheesecake filling over the prepared Oreo crust in each cup, smoothing the tops evenly with a spatula.
- Add Cookies: Crush the remaining 8 Oreo cookies and sprinkle the crumbs over the cheesecake layer for added texture and decoration.
- Chill: Cover the cups with plastic wrap and refrigerate for at least 4 hours, or until the cheesecake cups have set firmly.
- Serve: Remove the cups from the refrigerator. Optionally, garnish with additional whipped cream or Oreo crumbles before serving. Enjoy these rich and creamy no-bake Oreo cheesecake cups!
Notes
- Make sure the cream cheese is softened to room temperature for a smooth filling without lumps.
- Press the crust firmly to create a compact base that holds together well.
- Folding the whipped cream gently into the cream cheese mixture keeps the filling light and airy.
- Chilling time is essential for the cheesecake to set properly; do not skip refrigeration.
- For an extra touch, try drizzling melted chocolate or caramel on top before serving.
- Prep Time: 20 minutes
- Cook Time: 0 minutes
- Category: Dessert
- Method: No-Cook
- Cuisine: American
Keywords: Oreo cheesecake, no-bake cheesecake, easy dessert, Oreo dessert cups, creamy cheesecake
