
lled Chocolate Walnut Thumbprint Cookies Recipe
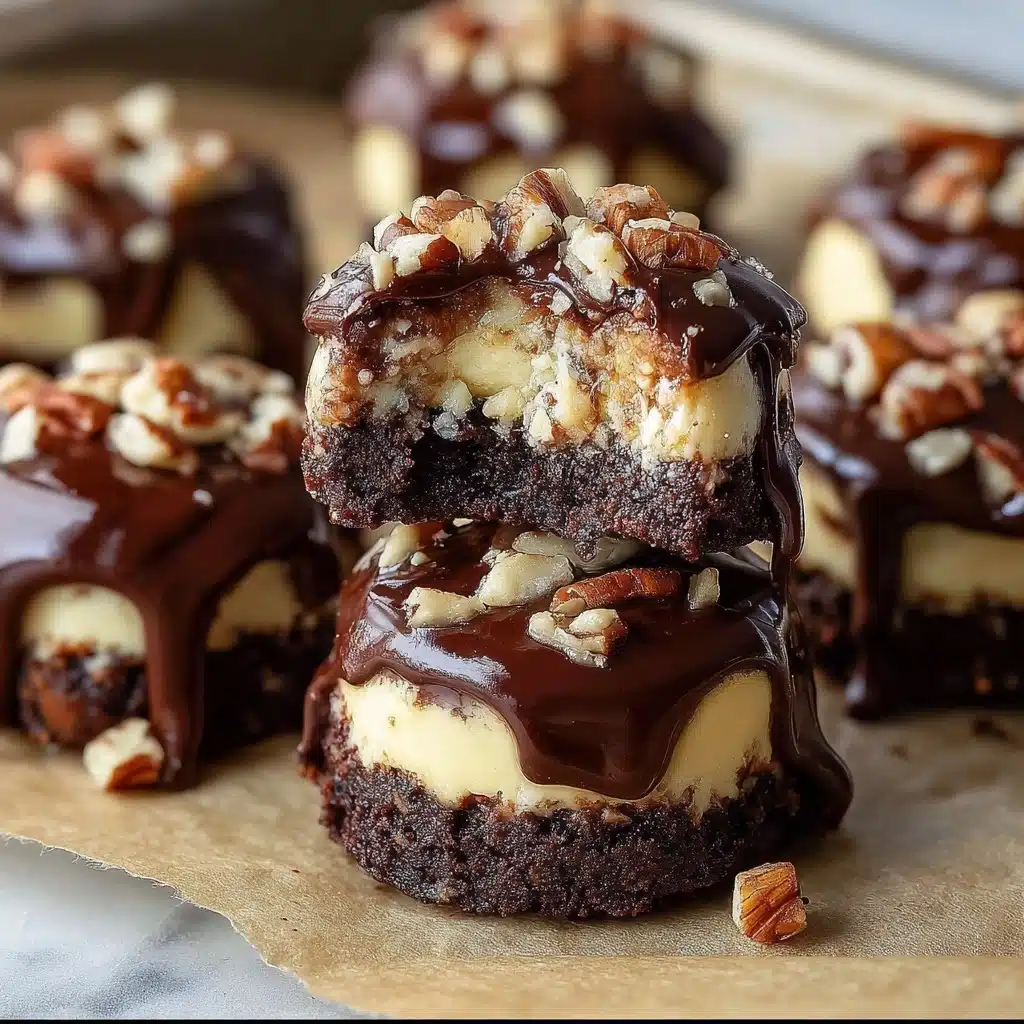
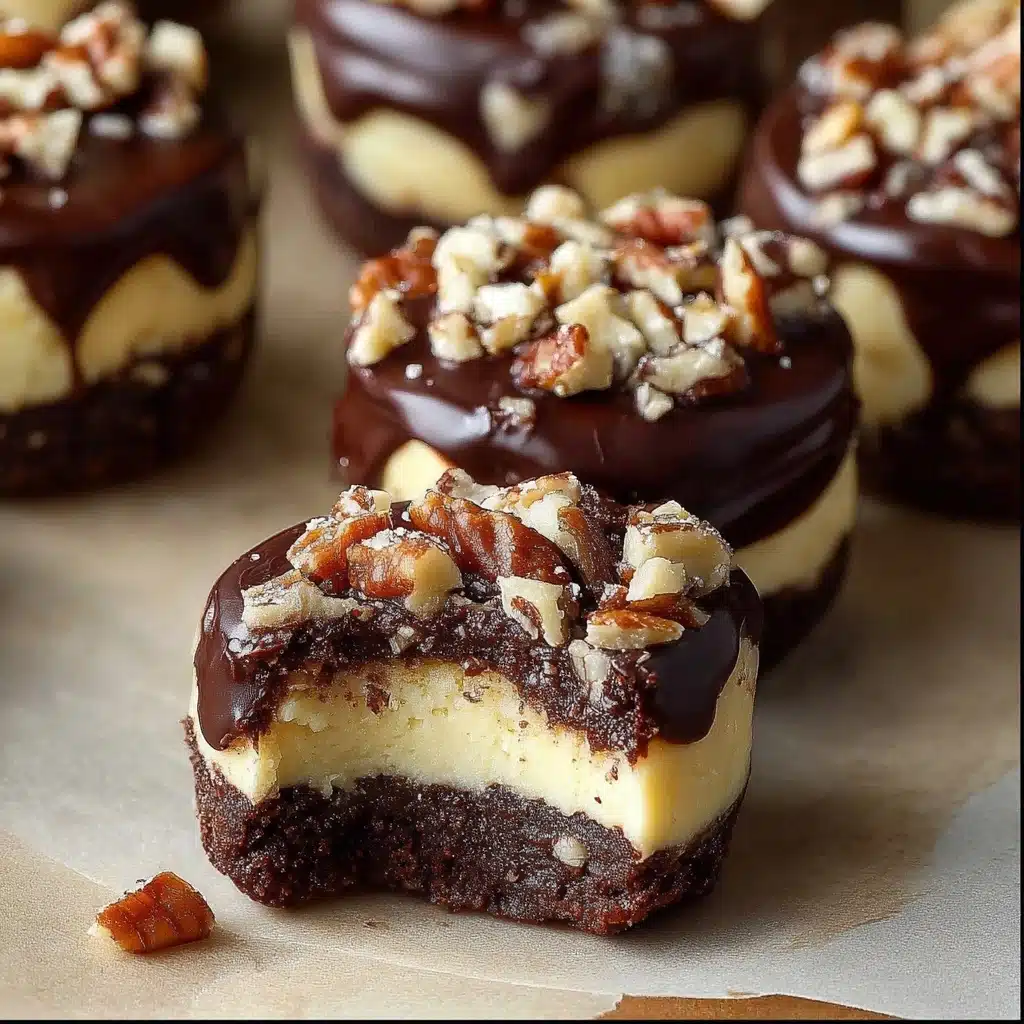
If you love everything about desserts, get ready to fall head over heels for lled Chocolate Walnut Thumbprint Cookies! These delightful little bites bring together a soft, chocolatey cookie, a creamy cheesecake filling, and a crunchy walnut coating for what I can only describe as pure cookie bliss. They make every occasion feel extra special, whether you’re sharing with friends over coffee or savoring them as a solo treat. With every bite, you’ll discover layers of texture and flavor that turn a simple cookie into an unforgettable indulgence.
Ingredients You’ll Need
Honestly, making lled Chocolate Walnut Thumbprint Cookies couldn’t be easier when you have the right ingredients on hand. Each one plays a crucial role, creating a perfect balance of richness, chewiness, and crunch that will have everyone asking for more!
- All-purpose flour: The backbone of the cookie, giving it structure and just the right amount of tenderness.
- Unsweetened cocoa powder: Deeply chocolatey and rich, it adds that luscious color and unmistakable cocoa flavor.
- Baking powder: Helps the cookies puff up slightly and keep a soft bite.
- Salt: Just a pinch enhances all the other flavors—don’t skip it!
- Unsalted butter, softened: The foundation for a melt-in-your-mouth texture and a subtle richness.
- Granulated sugar: Sweetens the cookies and gives a delicate, crisp edge.
- Large egg yolk: Adds a little chew and luxurious mouthfeel to the dough.
- Vanilla extract: Brings warmth and aroma, perfectly rounding out the cookie’s flavor.
- Finely chopped walnuts: These add crunch inside and out, and their earthy flavor pairs beautifully with chocolate.
- Cream cheese, softened: The creamy star ingredient of the filling—make sure it’s room temperature for easy mixing!
- Powdered sugar: Sweetens the cheesecake filling and ensures a velvety texture.
- Vanilla extract (for the filling): Adds subtle depth to the creamy center.
- Melted dark or milk chocolate (optional): Drizzle for an extra flourish of flavor and beauty.
- Extra chopped walnuts (optional): Perfect for sprinkling on top as a final, nutty touch.
How to Make lled Chocolate Walnut Thumbprint Cookies
Step 1: Prepare the Cookie Dough
Let’s get started by mixing the dry ingredients: whisk together the flour, cocoa, baking powder, and salt in a medium bowl so they’re evenly combined. In a separate larger bowl, beat the softened butter and granulated sugar until the mixture is light and fluffy—it’ll look almost creamy. Add in the egg yolk and vanilla, mixing until the dough comes together. Now, gradually combine the dry ingredients with the wet, stirring until the dough feels soft and cohesive. It’s truly the foundation for lled Chocolate Walnut Thumbprint Cookies!
Step 2: Chill the Dough
Don’t skip this step! Wrap your dough in plastic and pop it in the fridge for 30 minutes. This helps it firm up, making it much easier to handle and shape later on. Chilled dough also produces cookies that hold their shape better and have a wonderfully tender finish.
Step 3: Preheat the Oven
Preheat your oven to 350°F (175°C) while the dough chills. Line your baking sheet with parchment or a silicone mat. Doing this now means you can move seamlessly from shaping to baking—no waiting around!
Step 4: Shape the Cookies
Once the dough is chilled, scoop it out and roll it between your hands into 1-inch balls. Then, roll each dough ball in the chopped walnuts, pressing gently to help the nuts stick. Place them on your prepared baking sheet, ensuring there’s some space between each for even baking.
Step 5: Make the Thumbprint Indentation
This is where that classic thumbprint look shines! Use your thumb or the back of a small spoon to gently press into the center of each cookie, creating a little well. This will be filled later—so satisfying!
Step 6: Bake the Cookies
Bake the cookies for 10–12 minutes or until they’re just set. You want them to hold their shape without getting too hard. If the centers puff up, don’t worry; you’ll fix that when it’s time to fill them. Let the cookies cool completely right on the baking sheet for ultimate softness.
Step 7: Prepare the Cheesecake Filling
While your cookies are cooling, create the luscious cheesecake filling by beating together softened cream cheese, powdered sugar, and vanilla extract until smooth and creamy. It should be silky enough to spoon or pipe into those lovely wells you made earlier.
Step 8: Fill the Cookies
Once the cookies are fully cooled, fill each indentation with your cheesecake mixture. You can use a small spoon for a rustic look or pipe it in for café-worthy presentation. You’ll love how the creamy middle complements the chocolatey base and nutty crust!
Step 9: Optional Garnish
To really take your lled Chocolate Walnut Thumbprint Cookies over the top, drizzle with melted chocolate and a sprinkle of extra walnuts. Not only does this make them look gorgeous, but it adds another layer of flavor and crunch.
Step 10: Chill Before Serving
Pop your cookies in the refrigerator for 20–30 minutes so the cheesecake filling sets perfectly. This little chill time makes all the difference—giving you a filling that’s firm, creamy, and oh-so-delicious when you bite in.
How to Serve lled Chocolate Walnut Thumbprint Cookies
Garnishes
Give your cookies a bakery-worthy look and flavor boost with a drizzle of melted chocolate or a sprinkle of extra chopped walnuts. Powdered sugar dusted over the tops is a simple, elegant touch, but honestly, these beauties are showstoppers even just as they are!
Side Dishes
Pair lled Chocolate Walnut Thumbprint Cookies with a hot mug of coffee, some velvety hot chocolate, or even a scoop of vanilla ice cream for a little decadent contrast. A platter of fresh berries alongside adds a burst of freshness and makes dessert feel extra festive.
Creative Ways to Present
Arrange your cookies on a tiered stand for an afternoon tea vibe, or box them up in cute bakery boxes with parchment for instant gifting joy. For parties, display them on a dessert board surrounded by fruit, chocolates, and nuts for an unforgettable cookie centerpiece!
Make Ahead and Storage
Storing Leftovers
Keep leftover lled Chocolate Walnut Thumbprint Cookies in an airtight container in the fridge, where they’ll stay fresh and creamy for up to five days. The flavors actually get even better as they sit and meld together!
Freezing
You can freeze the unfilled cookie bases for up to 2 months—just cool them completely and store with parchment between layers. For filled cookies, freeze them in a single layer until solid, then transfer to an airtight container. Thaw overnight in the fridge before serving.
Reheating
These cookies don’t really need reheating (they’re best served chilled!), but if you like the cookie to be slightly softer, let them sit at room temperature for about 10–15 minutes before enjoying. Just be sure to keep the cheesecake filling cool until serving.
FAQs
Can I make lled Chocolate Walnut Thumbprint Cookies without nuts?
Absolutely! If you have nut allergies or just want a nut-free version, simply skip rolling the dough balls in walnuts or swap for toasted coconut or sprinkles for a fun twist.
Can I use a different kind of filling?
Definitely! While the classic cheesecake center is divine, you can get creative with peanut butter, Nutella, jam, or even lemon curd. Just ensure any soft filling you use sets well before stacking or storing the cookies.
Why did my thumbprints lose their shape when baking?
This usually happens if your dough isn’t chilled long enough. Make sure to thoroughly chill the dough before shaping, and if needed, re-press the wells gently right when the cookies come out of the oven.
How do I make the cheesecake filling smooth and lump-free?
Start with cream cheese at room temperature and sift your powdered sugar before mixing. Beat well until the filling is creamy and glossy—no one wants lumpy filling in their lled Chocolate Walnut Thumbprint Cookies!
Can I make these cookies ahead for a party?
Yes! Bake and fill the cookies a day ahead, and store them in the fridge. Even better, the flavors deepen overnight, so they taste just as amazing the next day (or two) after making them.
Final Thoughts
I wholeheartedly hope you’ll try making lled Chocolate Walnut Thumbprint Cookies in your own kitchen soon—they’re honestly a little celebration in every bite! Share them with your favorite people or savor them with a quiet cup of coffee; either way, I promise these are cookies worth coming back to again and again.
Print
lled Chocolate Walnut Thumbprint Cookies Recipe
- Total Time: 1 hour
- Yield: About 24 cookies 1x
- Diet: Vegetarian
Description
Indulge in the decadent combination of rich chocolate cookies filled with creamy cheesecake, topped with a drizzle of chocolate and crunchy walnuts in this delightful dessert recipe.
Ingredients
For the Cookies:
- 1 cup all-purpose flour
- 1/3 cup unsweetened cocoa powder
- ½ teaspoon baking powder
- ¼ teaspoon salt
- ½ cup unsalted butter, softened
- ½ cup granulated sugar
- 1 large egg yolk
- 1 teaspoon vanilla extract
- 1 cup finely chopped walnuts
For the Cheesecake Filling:
- 4 oz cream cheese, softened
- ¼ cup powdered sugar
- 1 teaspoon vanilla extract
For the Garnish (Optional):
- Melted dark or milk chocolate for drizzling
- Extra chopped walnuts for garnish
Instructions
- Prepare the Cookie Dough – In a medium bowl, whisk together the flour, cocoa powder, baking powder, and salt. Set aside. In a large mixing bowl, cream together the butter and sugar until light and fluffy. Add the egg yolk and vanilla extract, mixing until well combined. Gradually add the dry ingredients to the wet ingredients and mix until a soft dough forms.
- Chill the Dough – Cover the dough with plastic wrap and refrigerate for about 30 minutes to make it easier to handle.
- Preheat the Oven – Preheat your oven to 350°F (175°C). Line a baking sheet with parchment paper or a silicone baking mat.
- Shape the Cookies – Once the dough is chilled, roll it into 1-inch balls. Roll each ball in the chopped walnuts to coat them. Place the cookie dough balls on the prepared baking sheet, about 2 inches apart.
- Make the Thumbprint Indentation – Using your thumb or the back of a small spoon, gently press into the center of each cookie to create a well for the cheesecake filling.
- Bake the Cookies – Bake the cookies for about 10-12 minutes or until they are just set. Let the cookies cool completely on the baking sheet.
- Prepare the Cheesecake Filling – Beat the cream cheese, powdered sugar, and vanilla extract together in a small bowl until smooth and creamy.
- Fill the Cookies – Spoon or pipe the cheesecake filling into the thumbprint wells of each cookie.
- Optional Garnish – Drizzle melted chocolate over the filled cookies and sprinkle with extra chopped walnuts.
- Chill Before Serving – Allow the cookies to chill in the refrigerator for about 20-30 minutes to set the cheesecake filling before serving.
- Prep Time: 45 minutes
- Cook Time: 12 minutes
- Category: Dessert
- Method: Baking
- Cuisine: American
Nutrition
- Serving Size: 1 cookie
- Calories: 150
- Sugar: 8g
- Sodium: 70mg
- Fat: 10g
- Saturated Fat: 5g
- Unsaturated Fat: 4g
- Trans Fat: 0g
- Carbohydrates: 14g
- Fiber: 1g
- Protein: 2g
- Cholesterol: 25mg
Keywords: Cheesecake filled cookies, Chocolate thumbprint cookies, Dessert recipe


