
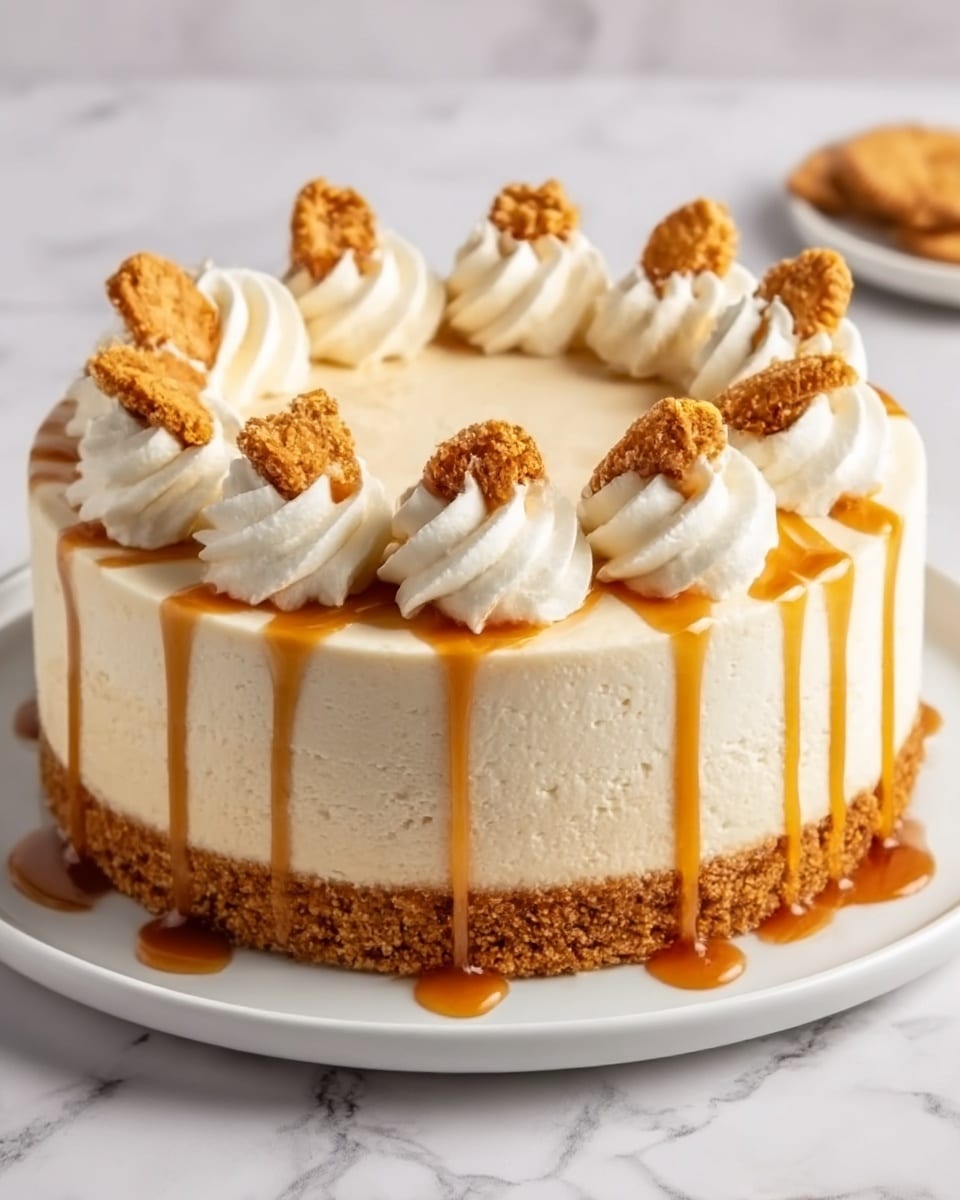
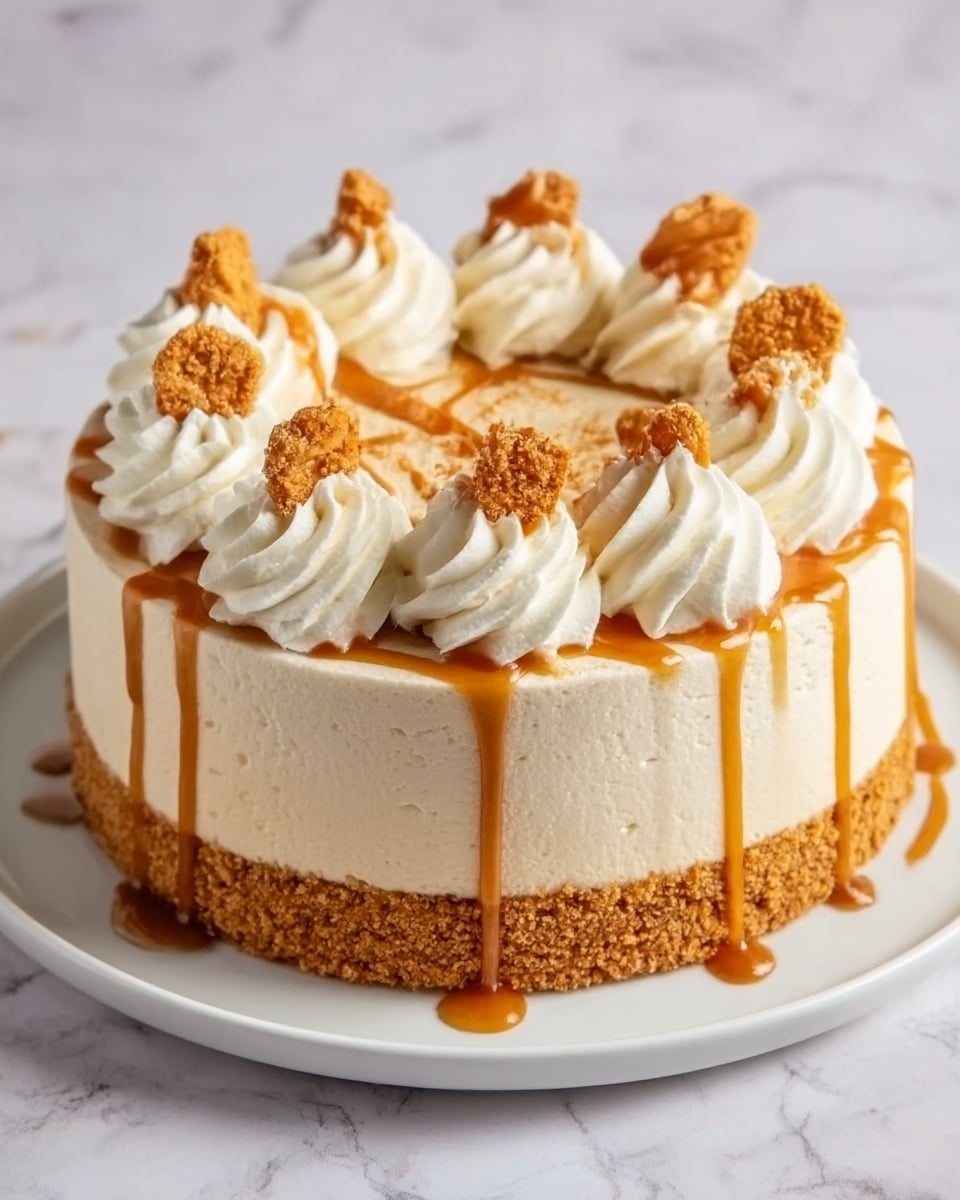
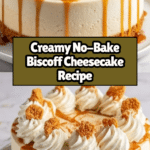
No-Bake Biscoff Cheesecake Recipe
Introduction
This no-bake Biscoff cheesecake is a delightful treat featuring a crunchy Biscoff cookie crust and a creamy, spiced filling. It’s simple to make and perfect for dessert lovers who enjoy the unique caramelized flavor of Biscoff spread.
Ingredients
- 2 cups Biscoff cookie crumbs (About 24-26 cookies, crushed or one 8.8 oz package)
- 5 tbsp unsalted butter, melted
- 2 tbsp granulated sugar (optional)
- 1 pinch salt
- 16 oz cream cheese, softened to room temperature
- 1 cup Biscoff cookie butter spread
- 3/4 cup powdered sugar
- 1 tsp vanilla extract
- 1/2 tsp ground cinnamon (optional)
- 1 1/2 cups heavy whipping cream, cold
- 1/2 cup heavy whipping cream (for topping)
- 1/4 cup Biscoff spread (for drizzling)
- Extra Biscoff cookies to taste (for decorating)
Instructions
- Step 1: Crush your Biscoff cookies into fine crumbs using a zip-top bag and a rolling pin or a food processor.
- Step 2: In a medium bowl, mix the cookie crumbs with melted butter, optional sugar, and a pinch of salt until the mixture feels like wet sand.
- Step 3: Press the mixture firmly into the bottom of a 9-inch springform pan and refrigerate while preparing the filling.
- Step 4: In a large mixing bowl, beat the cream cheese with an electric mixer until smooth and creamy.
- Step 5: Add in the Biscoff cookie butter spread and mix until well combined.
- Step 6: Incorporate powdered sugar, vanilla extract, and ground cinnamon until smooth.
- Step 7: In a separate bowl, whip the cold heavy cream until stiff peaks form, then gently fold it into the cream cheese mixture.
- Step 8: Pour the cheesecake filling over the prepared crust and smooth the top evenly.
- Step 9: Cover with plastic wrap and refrigerate for at least 6 hours, or ideally overnight, to allow it to set properly.
- Step 10: In a medium bowl, whisk together the remaining heavy cream and Biscoff spread until smooth and fluffy.
- Step 11: Carefully remove the cheesecake from the springform pan.
- Step 12: Drizzle the topping over the cheesecake and decorate with extra Biscoff cookies before slicing and serving.
Tips & Variations
- For a firmer crust, chill the crust for 15 minutes before adding the filling.
- Try adding a pinch of nutmeg for extra warmth along with the cinnamon.
- Use vegan cream cheese and coconut-based whipping cream for a dairy-free version.
- Swap Biscoff spread for peanut butter to create a rich peanut butter twist.
Storage
Store the cheesecake covered in the refrigerator for up to 3 days. For best texture, consume within this period. When reheating toppings or slices, let it come to room temperature for a few minutes, but avoid microwaving to preserve the creamy texture.
How to Serve
Serve this delicious recipe with your favorite sides.
FAQs
Can I make this cheesecake ahead of time?
Yes, this cheesecake actually benefits from sitting overnight to fully set and develop flavor, making it perfect for advance preparation.
What if I don’t have a springform pan?
You can use a regular cake pan lined with parchment paper for easier removal, but a springform pan is ideal for maintaining the cheesecake’s shape.
Print
No-Bake Biscoff Cheesecake Recipe
- Total Time: 6 hours 20 minutes
- Yield: 8 servings 1x
Description
Delicious no-bake Biscoff cheesecake featuring a crunchy Biscoff cookie crust, creamy Biscoff-flavored filling, and a luscious whipped Biscoff topping. This easy-to-make dessert combines the iconic caramelized flavors of Biscoff cookies in a rich, no-bake cheesecake that sets perfectly in the refrigerator, ideal for any occasion.
Ingredients
Crust
- 2 cups Biscoff cookie crumbs (About 24–26 cookies, crushed or one 8.8 oz package)
- 5 tbsp unsalted butter, melted
- 2 tbsp granulated sugar (optional)
- 1 pinch salt
Filling
- 16 oz cream cheese, softened to room temperature
- 1 cup Biscoff cookie butter spread
- 3/4 cup powdered sugar
- 1 tsp vanilla extract
- 1/2 tsp ground cinnamon (optional)
- 1 1/2 cups heavy whipping cream, cold
Topping
- 1/2 cup heavy whipping cream
- 1/4 cup Biscoff spread
- Extra Biscoff cookies, to taste (for decorating)
Instructions
- Preparation of the Cookie Crust: Crush the Biscoff cookies into fine crumbs using a zip-top bag and a rolling pin or food processor. Mix the crumbs with melted butter, optional sugar, and a pinch of salt in a medium bowl until the mixture resembles wet sand. Press this firmly into the bottom of a 9-inch springform pan and refrigerate while you prepare the filling.
- Making the Filling: Beat the softened cream cheese with an electric mixer in a large bowl until smooth and creamy. Add Biscoff cookie butter spread and mix well. Incorporate powdered sugar, vanilla extract, and optional ground cinnamon until smooth. In a separate bowl, whip the cold heavy cream until stiff peaks form, then gently fold it into the cream cheese mixture to maintain a light and airy texture.
- Assembling the Cheesecake: Pour the filling over the chilled crust and smooth the top evenly. Cover tightly with plastic wrap and refrigerate for at least 6 hours, preferably overnight, to allow the cheesecake to set properly.
- Preparing the Topping: In a medium bowl, whisk together the remaining heavy cream and Biscoff spread until smooth and fluffy, creating a creamy drizzle for the cheesecake.
- Serving the Cheesecake: Carefully remove the cheesecake from the springform pan. Drizzle the prepared topping over the cheesecake and decorate with extra Biscoff cookies as desired before slicing and serving.
Notes
- Ensure the cream cheese is completely softened to avoid lumps in the filling.
- Refrigeration time is crucial for the cheesecake to set properly, so do not skip or shorten it.
- Use a gentle folding technique when incorporating whipped cream to keep the filling light and airy.
- Optional cinnamon adds warmth but can be omitted for a purer Biscoff flavor.
- Biscoff cookies can be replaced with speculoos cookies if unavailable.
- Prep Time: 20 minutes
- Cook Time: 0 minutes
- Category: Dessert
- Method: No-Cook
- Cuisine: American
Keywords: No-Bake Biscoff Cheesecake, Biscoff dessert, No-bake cheesecake, easy cheesecake recipe, Biscoff cookie crust, creamy cheesecake
