
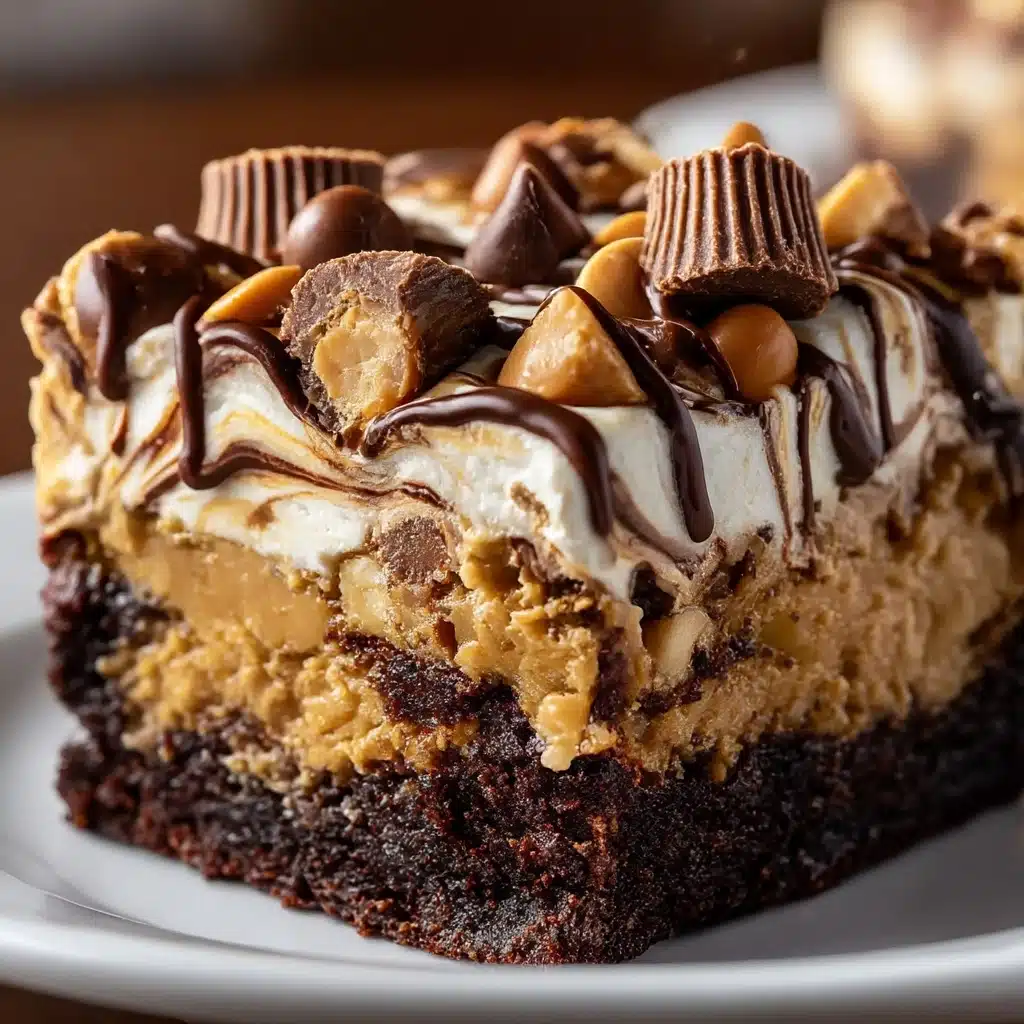
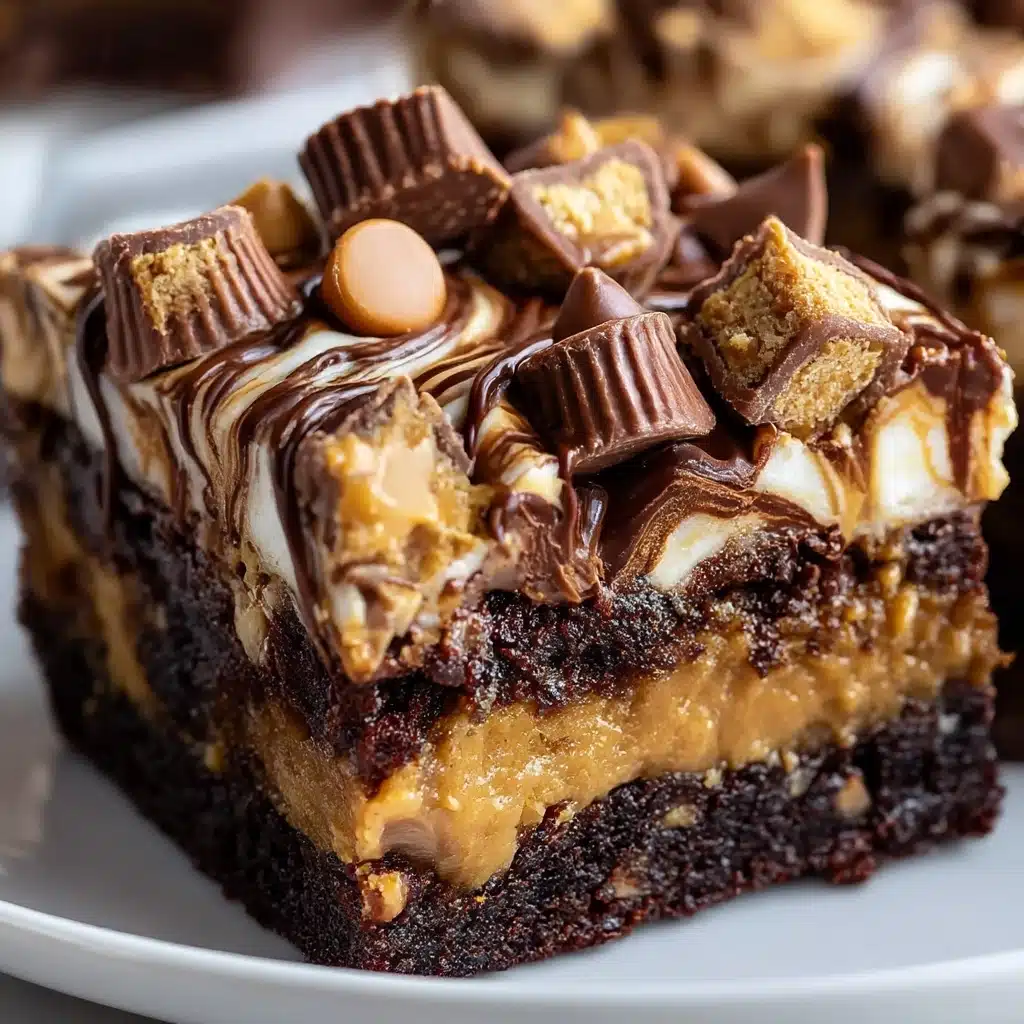
Peanut Butter Cup Dump Cake
If you’re craving a dessert that’s both simple to make and utterly decadent, this Peanut Butter Cup Dump Cake is an absolute must-try. Rich, gooey layers of creamy peanut butter, melty chopped peanut butter cups, and luscious sweetened condensed milk come together under a blanket of dry chocolate cake mix and melted butter. The key to this magic? Grease your nine by thirteen inch baking dish thoroughly with butter or a little non stick spray to prevent sticking and to help the base cook evenly, ensuring every bite bakes up perfectly gooey and irresistibly delicious. It’s a cozy crowd-pleaser that’s ready with minimal effort yet delivers maximum joy from first bite to last.
Ingredients You’ll Need
This recipe calls for straightforward ingredients that you likely already love and trust. Each one plays a key role: the peanut butter for that nutty foundation, chopped peanut butter cups adding surprise pockets of chocolaty bliss, sweetened condensed milk for luxurious creaminess, and the classic chocolate cake mix topping that bakes to a crisp, cobbler-like crust. Here’s everything you’ll want to gather before assembling this sweet marvel.
- Creamy peanut butter: Provides a smooth, rich base that spreads easily for an even layer.
- Chopped peanut butter cups: These little chunks melt into heavenly pockets of chocolate and peanut butter throughout the cake.
- Sweetened condensed milk: Adds decadent sweetness and a luscious gooey texture.
- Chocolate cake mix (dry): Creates a chocolatey topping that crisps up beautifully without any fuss.
- Unsalted butter (melted): Drizzled over the cake mix to help everything brown and bake into perfection.
- Milk chocolate chips: Sprinkle on top for extra melty goodness and rich chocolate flavor.
- Optional whipped cream or vanilla ice cream: Perfect for serving to cut through the richness and add a cool contrast.
How to Make Grease your nine by thirteen inch baking dish thoroughly with butter or a little non stick spray to prevent sticking and to help the base cook evenly
Step 1: Prepare the baking dish
This step is absolutely crucial for your dump cake success. Grease your nine by thirteen inch baking dish thoroughly with butter or a little non stick spray to prevent sticking and to help the base cook evenly. This simple but essential prep creates a non-stick surface so all those rich layers don’t cling to the pan, making serving and cleanup a breeze.
Step 2: Layer the peanut butter
Spread the creamy peanut butter evenly over the prepared baking dish’s bottom. Using a rubber or offset spatula helps smooth it out gently so you get one luscious, even blanket that sets the stage for the chocolates and cake mix to shine.
Step 3: Add the chopped peanut butter cups
Sprinkle half of the chopped peanut butter cups evenly over the peanut butter layer. These scattered bits melt during baking to create those surprise pockets of chocolatey bliss in every forkful.
Step 4: Pour on the sweetened condensed milk
Drizzle the sweetened condensed milk slowly and evenly over the peanut butter cup layer. This ingredient makes the texture wonderfully gooey and helps meld the flavors together as the cake bakes.
Step 5: Top with dry chocolate cake mix
Sprinkle the chocolate cake mix gently over the condensed milk. Do not stir or mix at this stage! Leaving the layers intact keeps the structure cobbler-like with crisp edges and gooey pockets beneath.
Step 6: Drizzle with melted butter
Drizzle the melted unsalted butter over the cake mix as evenly as possible. This golden touch helps brown the top perfectly and ensures the dry cake mix cooks into a moist, tender crust.
Step 7: Sprinkle chocolate chips and remaining peanut butter cups
Top everything off with a scattering of milk chocolate chips and the rest of your chopped peanut butter cups. Cover the surface well for melt-in-your-mouth chocolate bits throughout the final bake.
Step 8: Bake to bubbly perfection
Bake in a preheated 175°C (350°F) oven for 35 to 40 minutes. You’ll know it’s ready when the top is bubbly and slightly crisp around the edges, but still soft and gooey inside.
Step 9: Cool and enjoy
Allow the cake to cool for 10 to 15 minutes to set the layers slightly before serving. Grease your nine by thirteen inch baking dish thoroughly with butter or a little non stick spray to prevent sticking and to help the base cook evenly every time you make this—as that little detail makes sure your cake lifts out cleanly for the perfect presentation.
How to Serve Grease your nine by thirteen inch baking dish thoroughly with butter or a little non stick spray to prevent sticking and to help the base cook evenly
Garnishes
Top this dessert with a generous dollop of whipped cream or a scoop of vanilla ice cream for contrast. For an extra touch, scatter some additional chopped peanut butter cups or a light dusting of cocoa powder. Each garnish adds texture, flavor, and style to complement the richness of the cake.
Side Dishes
This dump cake is a stand-alone indulgence but can also pair wonderfully with fresh berries or a simple mixed green salad to balance the richness with fresh, tart notes if you want a lighter meal impact.
Creative Ways to Present
Serve this cake in individual ramekins for a charming personal dessert or pile it high in a trifle bowl layered with whipped cream for a show-stopping treat that’s both rustic and elegant. Remember, greasing your nine by thirteen inch baking dish thoroughly with butter or a little non stick spray to prevent sticking and to help the base cook evenly will make sure your portions come out beautifully no matter your serving style.
Make Ahead and Storage
Storing Leftovers
Store any leftovers in an airtight container. You can keep the dump cake at room temperature for up to three days, but refrigerating it will extend freshness up to one week while maintaining that fudgy, gooey texture.
Freezing
This cake freezes well! Wrap individual slices tightly in plastic wrap and foil or use a freezer-safe container. It will keep for up to two months and thaw beautifully overnight in the refrigerator.
Reheating
To bring back the fresh-from-the-oven experience, microwave individual servings for 20 to 30 seconds. This warms the cake through and revives the gooey, melty texture that makes this dessert so irresistible.
FAQs
Can I use crunchy peanut butter instead of creamy?
Definitely! Crunchy peanut butter adds delightful texture with little nut pieces, creating an extra layer of flavor and crunch in your dump cake. Just be sure to spread it as evenly as possible.
Is it okay to substitute other candies for peanut butter cups?
Yes! Feel free to experiment with your favorite chocolate candies like mini peanut butter cups, Reese’s Pieces, or even chocolate chips alone. Just chop them into chunks to maintain those gooey pockets of chocolate goodness.
Do I need to mix the cake mix with other ingredients before adding?
No mixing is needed at all. The beauty of a dump cake is in layering the dry cake mix right on top without stirring, allowing a crisp, cobbler-like crust to form during baking.
How should I store leftovers to keep them fresh?
Place leftovers in an airtight container. They last up to three days at room temperature or about one week refrigerated, maintaining flavor and texture beautifully.
Can I prepare this dessert ahead of time?
Yes! You can assemble it in advance but bake right before serving for best results. Alternatively, bake it and store leftovers properly, then reheat individual portions as needed.
Final Thoughts
This Peanut Butter Cup Dump Cake truly brings together the best of rich chocolate and creamy peanut butter in a fuss-free, crowd-pleasing way. The little secret that makes this recipe shine is to always grease your nine by thirteen inch baking dish thoroughly with butter or a little non stick spray to prevent sticking and to help the base cook evenly. With this simple step and a handful of delicious ingredients, you’ll have a luscious, gooey dessert that’s ready to delight family and friends anytime. So go ahead, dive into the sweet, comforting goodness—you deserve it!
Print
Peanut Butter Cup Dump Cake
- Total Time: 50 minutes
- Yield: 12 servings 1x
- Diet: Vegetarian
Description
This decadent Peanut Butter Cup Dump Cake combines creamy peanut butter, chopped peanut butter cups, and sweetened condensed milk layered under a dry chocolate cake mix and melted butter, baked until bubbly and crisp. Topped with milk chocolate chips and more peanut butter cups, it’s a delightful, gooey dessert that’s simple to prepare and perfect for parties or any chocolate and peanut butter craving.
Ingredients
Base & Layers
- 1 cup creamy peanut butter
- 1.5 cups chopped peanut butter cups, plus extra for garnish
- 1 can (400 g) sweetened condensed milk
- 1 box (432 g) dry chocolate cake mix
- 115 g unsalted butter, melted
- 175 g milk chocolate chips
- Optional: whipped cream or vanilla ice cream, for serving
Instructions
- Prepare baking dish: Preheat the oven to 175°C (350°F). Grease a 23×33 cm (9×13-inch) baking dish thoroughly with butter or non-stick spray to prevent sticking and ensure even cooking.
- Layer peanut butter: Spread the creamy peanut butter evenly across the bottom of the prepared baking dish using a spatula to create a smooth, even layer.
- Add candy layer: Sprinkle half of the chopped peanut butter cups evenly over the peanut butter layer for melty chocolate bits in every slice.
- Add sweetened condensed milk: Pour the sweetened condensed milk slowly and evenly over the candy layer to create a gooey, luscious texture.
- Add cake mix: Sprinkle the dry chocolate cake mix uniformly over the top. Do not stir or mix to maintain distinct layers.
- Drizzle butter: Pour the melted unsalted butter evenly over the cake mix, covering as much surface as possible to help the cake brown and stay soft.
- Top with chocolate and candy: Sprinkle the milk chocolate chips and remaining chopped peanut butter cups evenly across the top for extra gooeyness and texture.
- Bake the cake: Place the dish in the preheated oven and bake for 35–40 minutes until the top is bubbly and slightly crisp at the edges.
- Cool and serve: Let the cake cool for 10–15 minutes to set the layers slightly before serving. Enjoy warm, optionally topped with whipped cream or vanilla ice cream for a creamy contrast.
Notes
- For extra crunch, add 0.5 cups chopped peanuts or crushed pretzels on top before baking.
- Substitute chopped Reese’s Pieces or mini peanut butter cups for variety in candy options.
- Store leftovers in an airtight container: up to 3 days at room temperature or up to 1 week refrigerated.
- This dessert freezes beautifully; thaw and reheat for best texture.
- For a nut-free version, use sunflower seed butter and allergy-safe chocolate candies.
- Using room temperature peanut butter makes spreading easier and more even.
- Do not stir the layers at any point to retain gooey pockets of peanut butter and chocolate.
- Prep Time: 10 minutes
- Cook Time: 40 minutes
- Category: Dessert
- Method: Baking
- Cuisine: American
Nutrition
- Serving Size: 1 slice (approx. 1/12th of the cake)
- Calories: 420 kcal
- Sugar: 35 g
- Sodium: 260 mg
- Fat: 25 g
- Saturated Fat: 10 g
- Unsaturated Fat: 12 g
- Trans Fat: 0.5 g
- Carbohydrates: 42 g
- Fiber: 3 g
- Protein: 7 g
- Cholesterol: 40 mg
Keywords: peanut butter cup dump cake, chocolate peanut butter dessert, easy layered dessert, dump cake recipe, quick chocolate cake, peanut butter dessert
