
Reese’s Peanut Butter Cup Poke Cake Recipe
Introduction
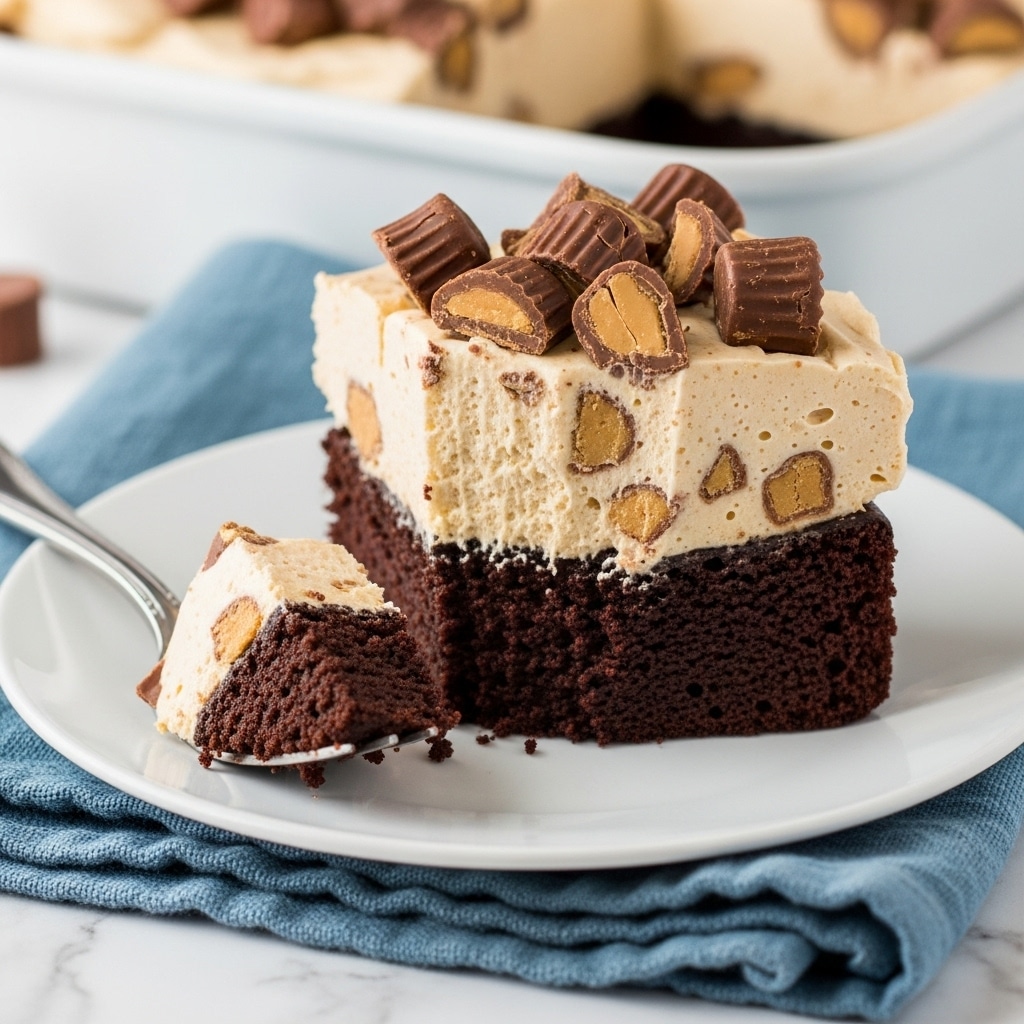
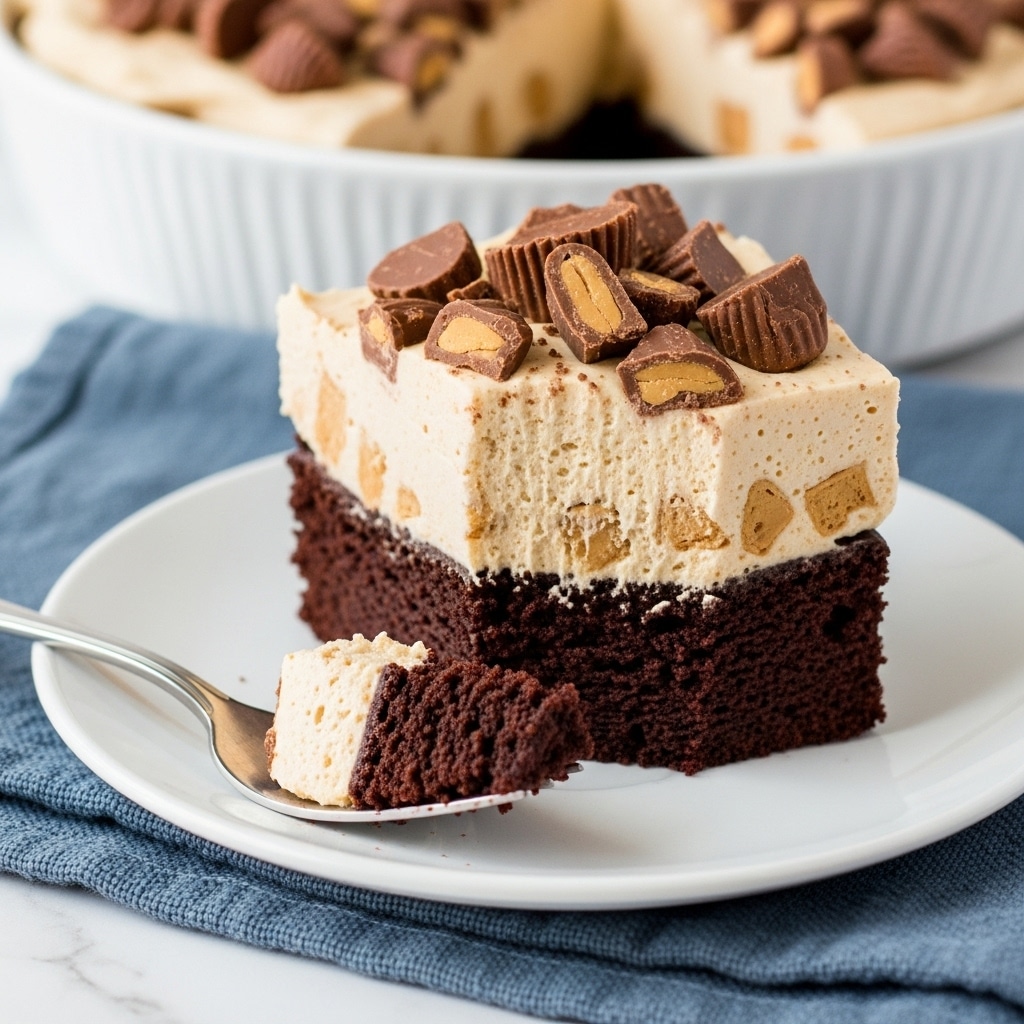
This Reese’s Peanut Butter Cup Poke Cake is a rich, indulgent dessert that combines chocolate, creamy peanut butter, and vanilla pudding in every bite. It’s a fun twist on a classic cake, decorated with chopped mini peanut butter cups for extra texture and flavor. Perfect for peanut butter lovers looking for an easy crowd-pleaser.
Ingredients
- 15.25 oz chocolate cake mix (plus ingredients to prepare the cake)
- 3.4 oz vanilla instant pudding mix
- 2 cups cold milk
- 1 1/2 cups creamy peanut butter (divided)
- 16 oz chocolate frosting
- 8 oz whipped topping (thawed)
- 25 mini Peanut Butter Cups (unwrapped and roughly chopped)
Instructions
- Step 1: Prepare and bake the chocolate cake according to the package instructions in a 13 x 9-inch cake pan. Allow it to cool for 15-20 minutes.
- Step 2: Using the round end of a wooden spoon, poke holes evenly spaced every 1/2 to 1 inch across the cake surface.
- Step 3: In a medium bowl, combine the vanilla pudding mix and cold milk. Whisk briskly for 2 minutes until the pudding mix is fully dissolved.
- Step 4: Divide the peanut butter, setting aside 1 cup. Whisk the remaining 1/2 cup peanut butter into the pudding mixture until smooth and well combined.
- Step 5: Pour the peanut butter pudding mixture evenly over the cake, making sure to fill the holes as much as possible.
- Step 6: Microwave the chocolate frosting in a microwave-safe bowl for 15-20 seconds until pourable. Drizzle over the cake and spread evenly using the back of a spoon or an offset spatula.
- Step 7: Let the cake cool completely to room temperature.
- Step 8: In a large bowl, whisk the reserved 1 cup peanut butter together with the whipped topping. Spread this peanut butter topping evenly over the cooled cake.
- Step 9: Scatter the chopped mini Peanut Butter Cups over the top of the cake for garnish.
- Step 10: Refrigerate the cake for at least 4 hours before serving to allow flavors to meld.
Tips & Variations
- Use creamy peanut butter for a smoother texture; natural peanut butter can work but may change the consistency slightly.
- For a fudgier cake, substitute the chocolate cake mix with a devil’s food cake mix.
- Try adding a sprinkle of sea salt on top to balance the sweetness.
- Use crunchy peanut butter in the topping for added texture.
Storage
Store the poke cake covered in the refrigerator for up to 4 days. It can be served chilled or brought to room temperature for about 20 minutes before serving. Reheat individual slices briefly in the microwave if desired, but the cake is best enjoyed cold.
How to Serve
Serve this delicious recipe with your favorite sides.
FAQs
Can I make this cake ahead of time?
Yes, this cake actually improves if made ahead and refrigerated for at least 4 hours or overnight. The flavors meld nicely and the cake stays moist.
Can I substitute fresh whipped cream for the whipped topping?
Yes, fresh whipped cream can be used in place of the thawed whipped topping for a lighter texture, though the topping helps maintain stability over time.
Print
Reese’s Peanut Butter Cup Poke Cake Recipe
- Total Time: 4 hours 55 minutes
- Yield: 12 servings 1x
Description
This Reese’s Peanut Butter Cup Poke Cake is a decadent and irresistible dessert combining rich chocolate cake with creamy peanut butter pudding, smooth chocolate frosting, and whipped peanut butter topping, all finished with chopped mini Reese’s Peanut Butter Cups. It offers the perfect blend of chocolate and peanut butter flavors in a moist, flavorful poke cake that’s perfect for any celebration or indulgent treat.
Ingredients
Cake
- 15.25 oz chocolate cake mix (plus ingredients required to prepare the cake as per package)
Pudding Filling
- 3.4 oz vanilla instant pudding mix
- 2 cups cold milk
- 1 1/2 cups creamy peanut butter, divided
Topping
- 16 oz chocolate frosting
- 8 oz whipped topping, thawed
- 25 mini Reese’s Peanut Butter Cups, unwrapped and roughly chopped
Instructions
- Prepare Cake: Prepare and bake the chocolate cake mix according to package instructions in a 13 x 9-inch cake pan. Bake until a toothpick inserted comes out clean.
- Cool and Poke Holes: Let the cake cool for 15-20 minutes. Using the round end of a wooden spoon, poke holes about every 1/2 to 1 inch across the entire cake surface.
- Make Pudding Mixture: In a medium bowl, combine the vanilla instant pudding mix and cold milk. Whisk briskly for 2 minutes until the pudding mix is completely dissolved.
- Add Peanut Butter to Pudding: Divide the peanut butter, reserving 1 cup for later. Whisk 1/2 cup peanut butter into the pudding until smooth and combined.
- Fill Cake Holes: Pour the peanut butter pudding mixture evenly over the cake, ensuring the holes fill up as much as possible for maximum flavor infusion.
- Heat and Spread Frosting: In a microwave-safe bowl, microwave the chocolate frosting for 15-20 seconds until it becomes pourable. Drizzle the warm frosting over the cake and spread evenly using the back of a spoon or an offset spatula.
- Let Cake Cool Completely: Allow the cake to cool fully at room temperature to let the layers set properly before adding the final topping.
- Prepare Whipped Peanut Butter Topping: In a large bowl, whisk together the remaining 1 cup peanut butter and the thawed whipped topping until smooth and well blended.
- Spread Topping and Add Candy: Spread the peanut butter whipped topping evenly over the cooled cake. Scatter the roughly chopped mini Reese’s Peanut Butter Cups evenly on top to garnish and add texture.
- Refrigerate and Serve: Refrigerate the cake for at least 4 hours before serving to allow flavors to meld and the cake to firm up. Store leftovers covered in the refrigerator.
Notes
- The cake is best served chilled after refrigerating for at least 4 hours.
- For easier frosting spreading, slightly warm the frosting only until pourable, not hot.
- Use regular or crunchy peanut butter depending on your texture preference.
- Ensure the whipped topping is fully thawed before mixing for a smooth blend.
- Chopping the mini peanut butter cups roughly adds a nice texture contrast on top.
- Prep Time: 20 minutes
- Cook Time: 35 minutes
- Category: Dessert
- Method: Baking
- Cuisine: American
Keywords: Reese’s, peanut butter, poke cake, chocolate cake, pudding, dessert, no-bake topping, creamy, party cake


