
Boston Cream Pie Cheesecake Recipe
Introduction
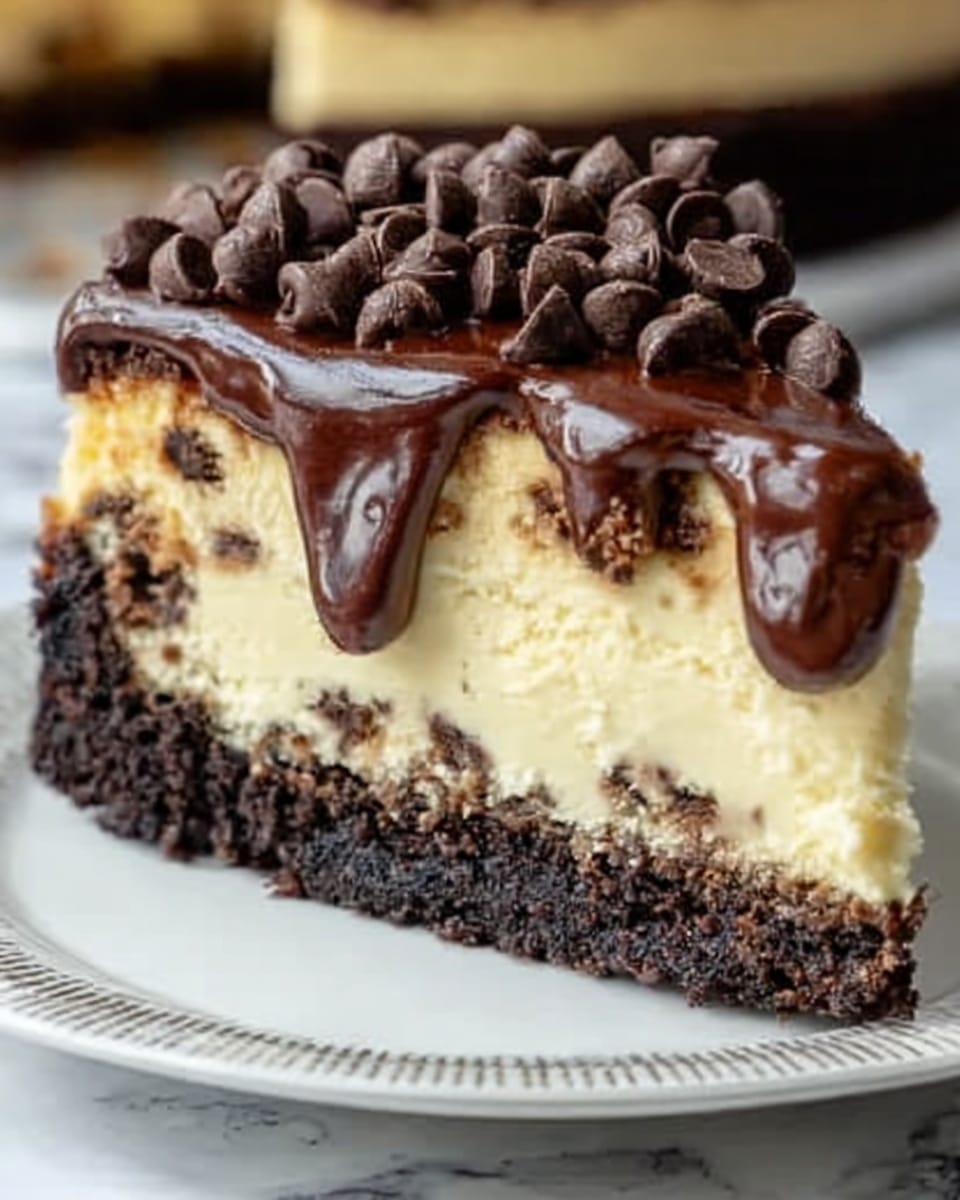
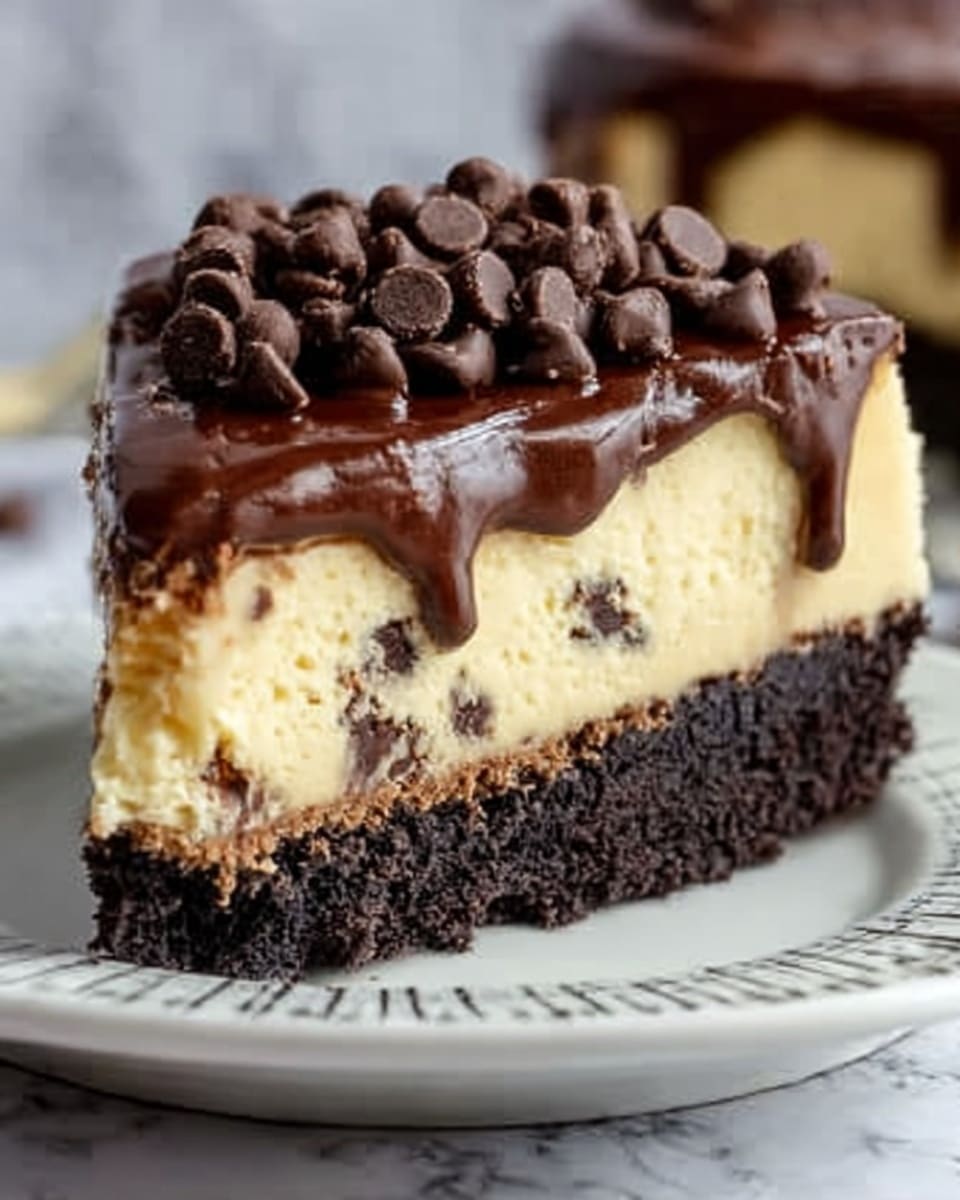
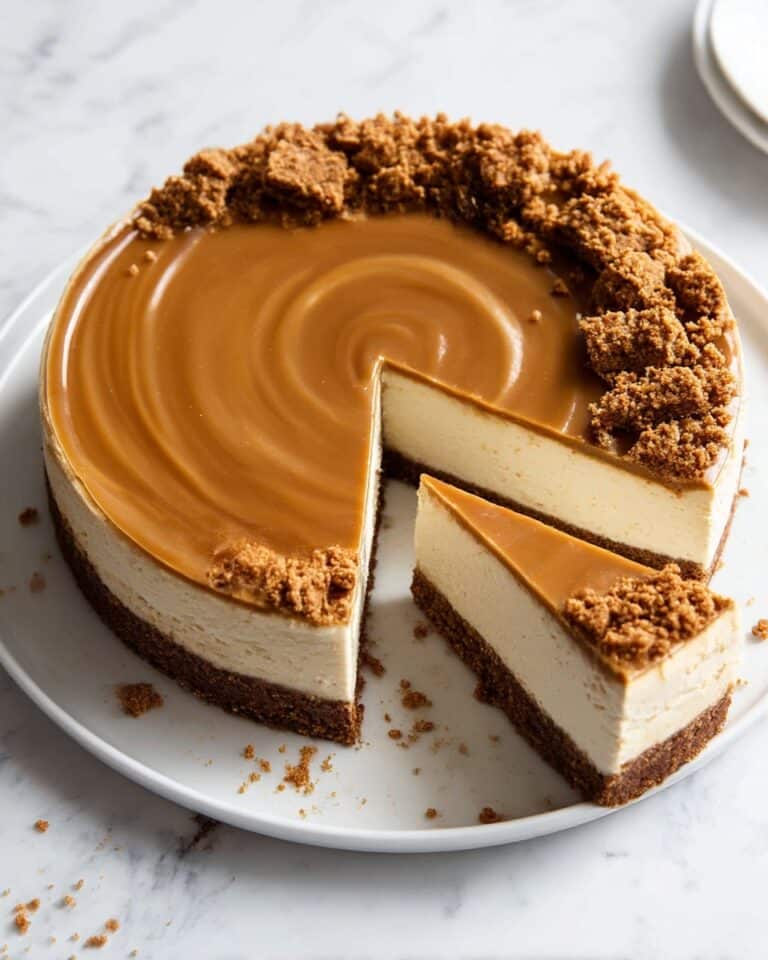
Indulge in the rich and creamy Boston Cream Pie Cheesecake, a delightful fusion of classic dessert flavors. This luscious cheesecake combines a chocolate cookie crust, dual-layered vanilla and chocolate batter, and a silky chocolate ganache topping for a truly irresistible treat.
Ingredients
- 1 ½ cups crushed chocolate cookies
- 5 tablespoons melted unsalted butter
- 24 ounces cream cheese, softened
- 1 cup granulated sugar
- 1 ½ teaspoons vanilla powder
- 3 large eggs
- ½ cup sour cream
- 4 ounces bittersweet chocolate, melted
- ½ cup heavy cream
- 1 cup semi-sweet chocolate chips
Instructions
- Step 1: Preheat your oven to 325°F (163°C) and grease a 9-inch springform pan to prepare for the crust.
- Step 2: Mix the crushed chocolate cookies with the melted unsalted butter. Press this mixture firmly into the bottom of the springform pan. Bake for 10 minutes, then remove and let it cool.
- Step 3: In a large bowl, beat the softened cream cheese until smooth and creamy. Add the granulated sugar, vanilla powder, eggs one at a time, beating well after each addition. Stir in the sour cream until the batter is smooth.
- Step 4: Divide the batter evenly into two bowls. Stir the melted bittersweet chocolate into one bowl. Pour the chocolate batter over the cooled crust in the pan, then carefully spoon the vanilla batter on top to create two distinct layers.
- Step 5: Place the springform pan on a baking sheet to catch any drips. Bake for 50 to 60 minutes, until the edges are set and the center slightly jiggles when gently shaken.
- Step 6: Turn off the oven and leave the cheesecake inside with the door slightly open for about an hour. Afterward, refrigerate the cheesecake for at least 6 hours or preferably overnight to fully set.
- Step 7: To make the ganache, heat the heavy cream until it just simmers. Pour the hot cream over the semi-sweet chocolate chips in a bowl. Let sit for a minute, then stir until smooth and glossy.
- Step 8: Pour the ganache evenly over the chilled cheesecake, smoothing the top. Return to the refrigerator to chill briefly before serving.
Tips & Variations
- For a richer crust, try adding a tablespoon of cocoa powder to the cookie mixture.
- Vanilla powder can be substituted with 1 ½ teaspoons of pure vanilla extract if preferred.
- Use a water bath during baking to prevent cracking and achieve a creamier texture.
- Try topping the cheesecake with fresh berries for a bright contrast to the chocolate ganache.
Storage
Store the cheesecake covered in the refrigerator for up to 4 days. Keep it in the springform pan or transfer to an airtight container. To serve, let it sit at room temperature for 15 minutes for a silky texture. You can also freeze the cheesecake for up to a month; thaw overnight in the fridge before serving.
How to Serve
Serve this delicious recipe with your favorite sides.
FAQs
Can I use regular vanilla extract instead of vanilla powder?
Yes, you can substitute 1 ½ teaspoons of vanilla extract for the vanilla powder. Add it with the other wet ingredients for best incorporation.
Why does the cheesecake need to cool in the oven with the door ajar?
Cooling the cheesecake gradually in the oven prevents sudden temperature changes, which reduces the chance of cracks forming on the surface while it sets.
Print
Boston Cream Pie Cheesecake Recipe
- Total Time: 7 hours 30 minutes
- Yield: 10 servings 1x
Description
Indulge in a rich and creamy Boston Cream Pie Cheesecake, featuring a chocolate cookie crust, luscious layers of vanilla and chocolate cheesecake, and a smooth chocolate ganache topping. This delightful dessert combines the best of classic Boston cream pie and cheesecake for a decadent treat perfect for special occasions or any time you want to impress your guests.
Ingredients
Crust
- 1 ½ cups crushed chocolate cookies
- 5 tablespoons melted unsalted butter
Cheesecake Filling
- 24 ounces cream cheese, softened
- 1 cup granulated sugar
- 1 ½ teaspoons vanilla powder
- 3 large eggs
- ½ cup sour cream
- 4 ounces bittersweet chocolate, melted
Ganache
- ½ cup heavy cream
- 1 cup semi-sweet chocolate chips
Instructions
- Prepare the Oven and Pan: Preheat your oven to 325°F (163°C) and grease a 9-inch springform pan to prevent sticking and ensure easy release.
- Make the Crust: Combine the crushed chocolate cookies with the melted unsalted butter, mixing well. Press this mixture firmly into the bottom of the springform pan to form an even crust. Bake the crust for 10 minutes, then remove it and let it cool completely.
- Mix Cheesecake Batter: In a large bowl, beat the softened cream cheese until smooth and creamy. Gradually mix in the granulated sugar, vanilla powder, and eggs one at a time, ensuring each is fully incorporated before adding the next. Stir in sour cream until the batter is smooth and creamy.
- Divide and Flavor Batter: Split the batter into two equal portions. Stir the melted bittersweet chocolate into one half, creating a rich chocolate layer. Pour the chocolate batter over the cooled crust evenly, then carefully spoon the vanilla batter on top to create two distinct layers.
- Bake the Cheesecake: Place the springform pan on a baking sheet to catch any spills and bake for 50 to 60 minutes. The cheesecake should be slightly set in the center but still have a little jiggle when you gently shake the pan.
- Cool the Cheesecake: Turn off the oven and leave the cheesecake inside with the door ajar for about an hour to cool gradually. This helps prevent cracking. Afterward, refrigerate the cheesecake for at least 6 hours or overnight to fully set.
- Prepare the Ganache: Heat the heavy cream until it just begins to simmer. Pour the hot cream over the semi-sweet chocolate chips and let it sit for a minute, then stir until the mixture is smooth and glossy.
- Finish and Serve: Pour the prepared ganache evenly over the chilled cheesecake. Place the cheesecake back in the refrigerator for a short time to let the ganache set before serving. Enjoy your decadent Boston Cream Pie Cheesecake!
Notes
- Ensure the cream cheese is fully softened to avoid lumps in the batter.
- Gradual cooling helps prevent cracks on the cheesecake surface.
- You can substitute vanilla powder with 1 ½ teaspoons of vanilla extract if unavailable.
- Use a water bath during baking for even cooking and to reduce cracking (optional).
- For best results, let the cheesecake chill overnight to develop flavors and texture.
- Prep Time: 20 minutes
- Cook Time: 1 hour 10 minutes
- Category: Dessert
- Method: Baking
- Cuisine: American
Keywords: Boston Cream Pie Cheesecake, cheesecake recipe, chocolate cheesecake, dessert, chocolate ganache, layered cheesecake


